
NetCreator is a free and open source Cinema 4D plugin that can generate splines objects with cool hollowed out effect, it’s useful in scenes with sense of science and technology. However there’s little information about NetCreator, if you are interesting in this plugin, you can find detailed instructions on how to use NetCreator with Cinema 4D in this article.
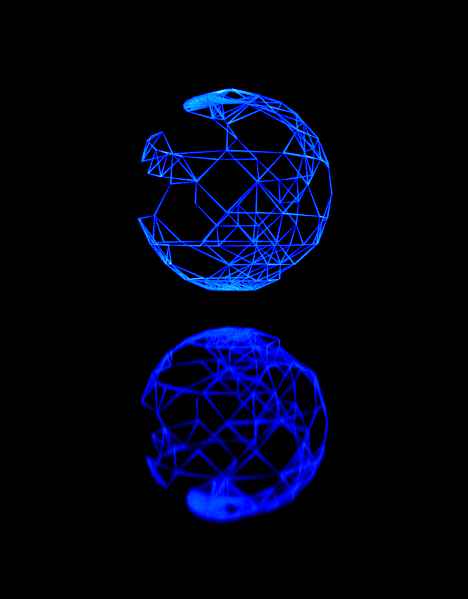
NetCreator can also be used to generate objects with particle effects, in most cases we should use professional software such as x-particles plugin with Cinema 4D to implement the particle effects, but for some special circumstances, the NetCreator plugin maybe also one of the choice, image on the left is an example, there is a blue hollow sphere, and a reflection of the sphere from rough ground.
In this article we will give an introduction on how to use NetCreator plugin with Cinema 4D, we use Cinema 4D R23 version as an example, in most cases, similar operations can be used in other C4D versions.
You can learn more and download V1.3 version of NetCreator plugin at here.
1. Property description
NetCreator plugin’s parameters can be divided into three groups: Object Properties, Distance and Propagation, let’s explain it one by one.
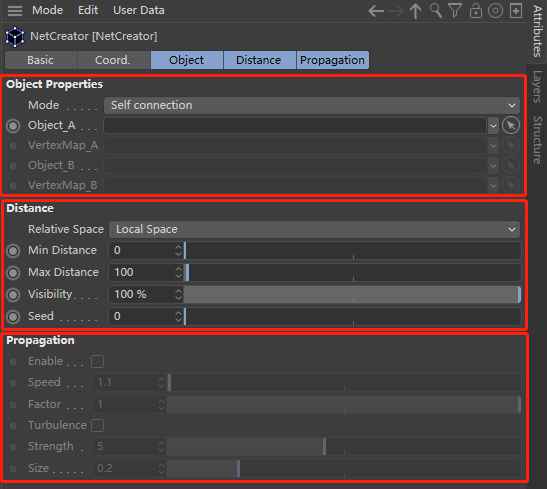
1.1 Object Properties: this property group define all the parameters which related to original objects:
Mode is used to define whether to generate splines on one object or between two objects.
If the property “Mode” set to “Self connection” means that generate a new splines object based on original one object, and if set to “A-B Connection” means generate a new splines object based on original two objects.
Object_A: specifies the name of original object, this original object’s vertices will be paired as two endpoints to generate a linear spline, then all the generated linear splines are connected to form an integrated splines object.
VertexMap_A is used to define the weight map of vertices of the original object that specified by property “Object_A”, and the weight of each vertex will be used to determine whether this vertex is used to generate splines or not, In the current algorithm of NetCreator plugin, only the vertices with weight greater than 0.5 (weight range is between 0-1) are used to generate splines.
Notes: property “VertexMap_A” must be defined in advance If you need to use the plugin’s dynamic generation function (that is: Propagation for VertexMap).
If only use the static frame generation function of NetCreator, this parameter can be leave empty, in this case all vertices of original object can be used to generate splines object.
Object_B and VertexMap_B have the same definition as Object_A and VertexMap_A, but these two parameters can only be available when generate a splines object by two objects (i.e. property “Mode” is set to “A-B Connection”)
1.2 Distance: define parameters decide if the pairs of vertices can be used to generate the splines object.
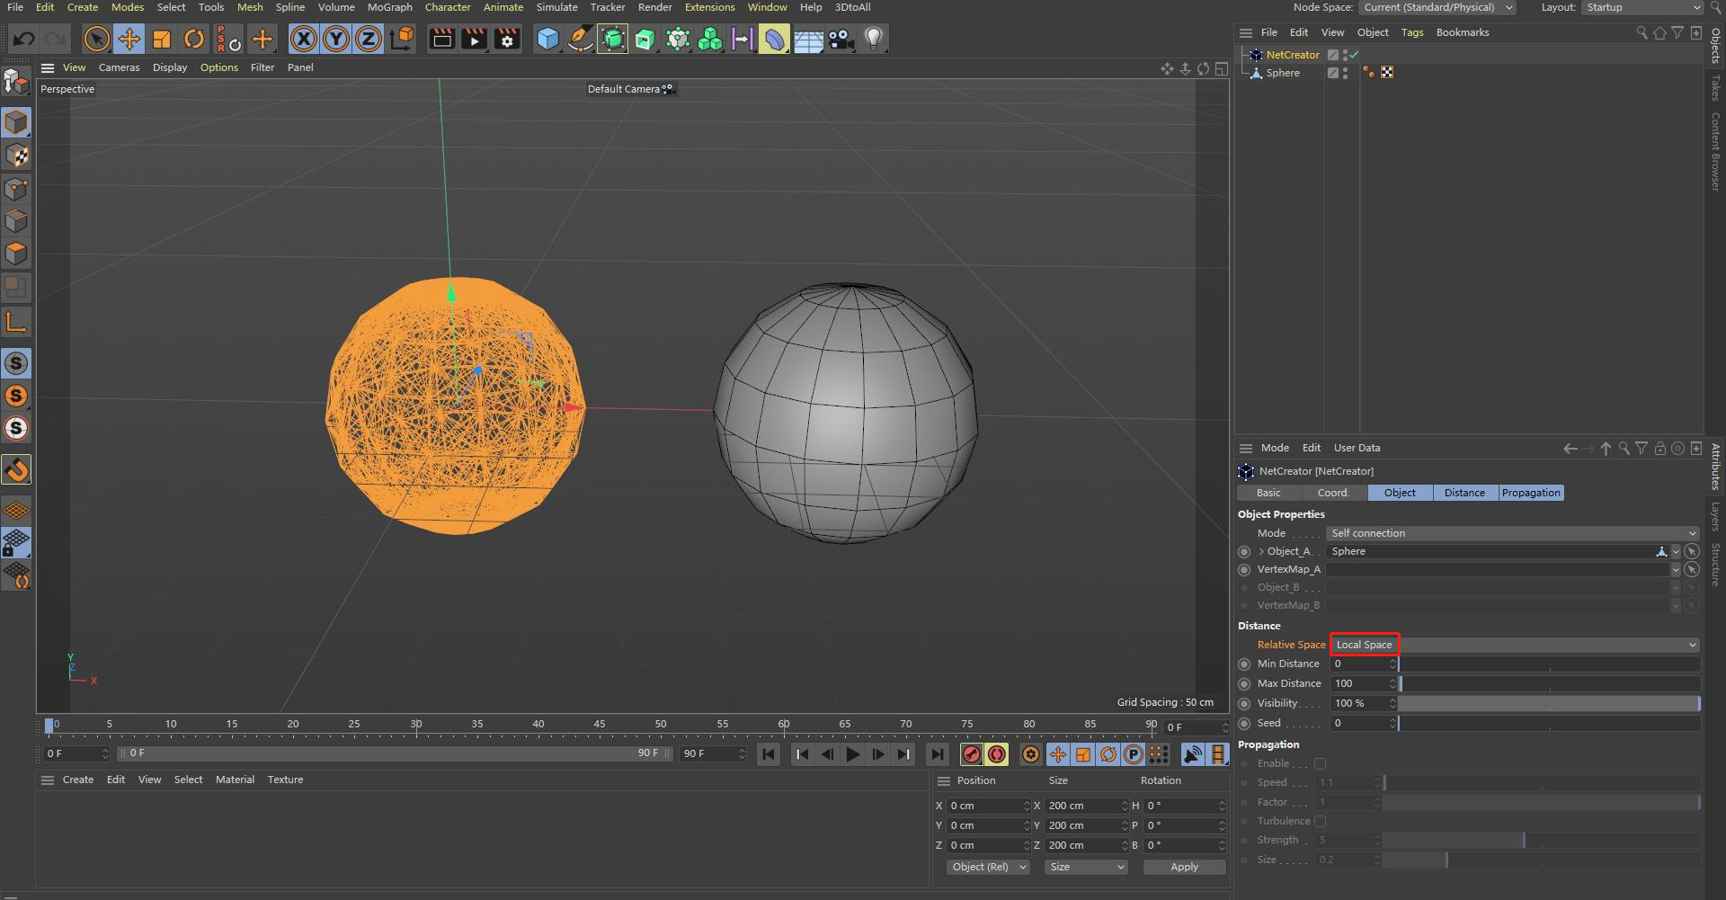
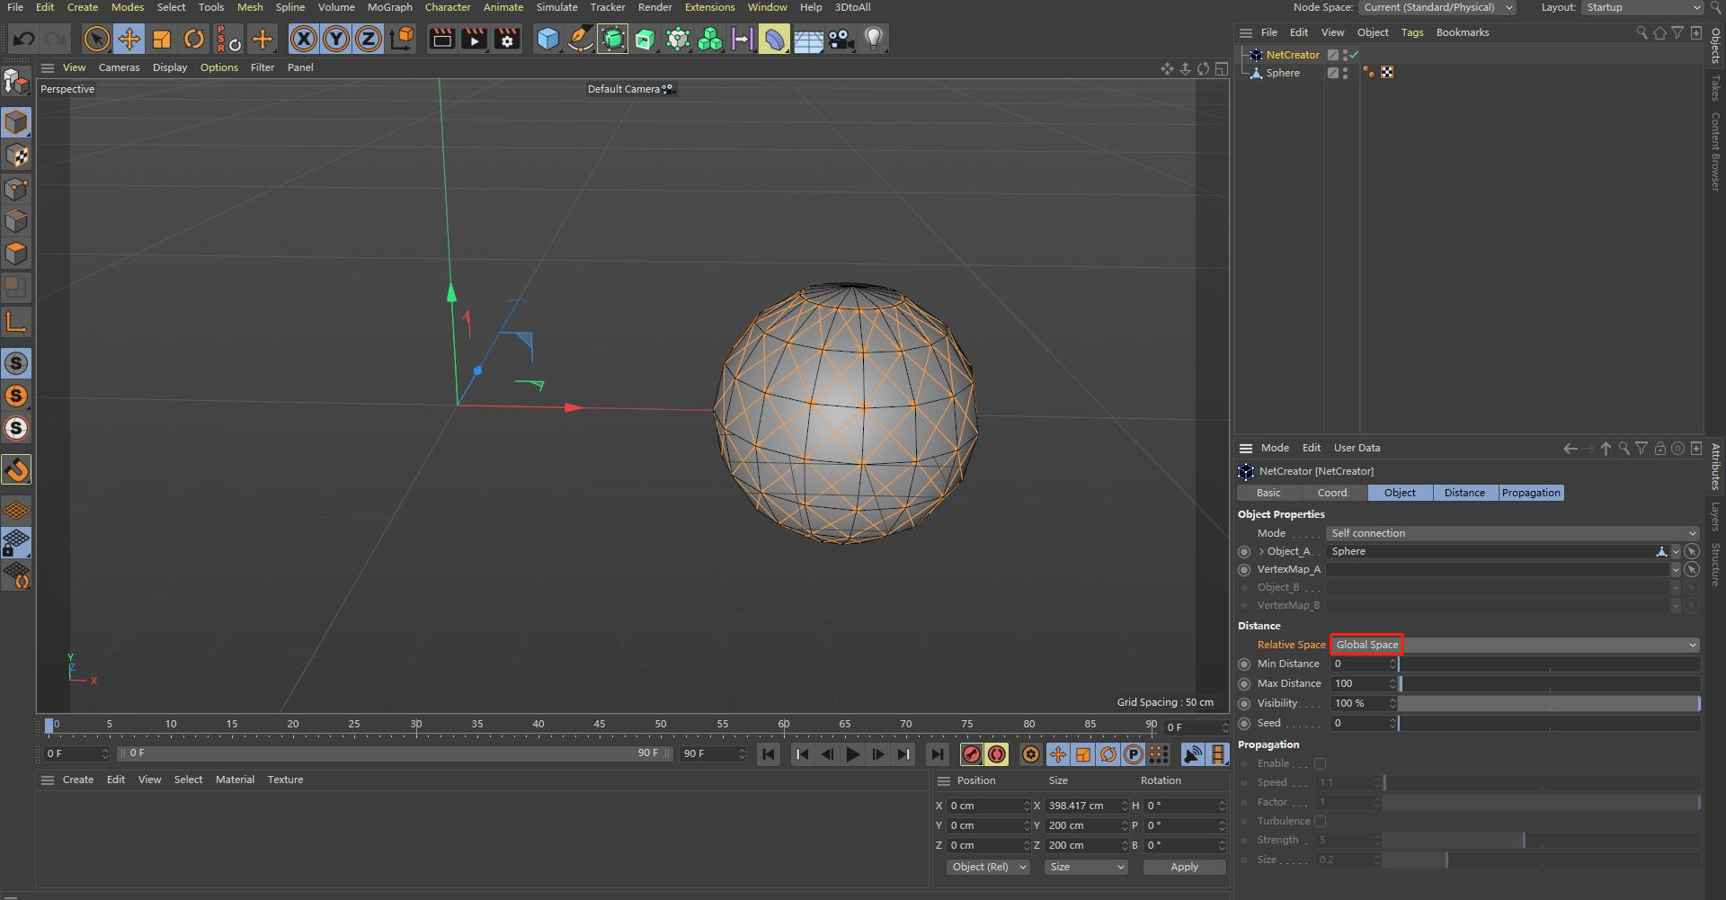
Relative Space: define the relative position coordinate system of generated splines object, if “Local Space” is selected, the position of generated splines object based on world coordinate system (as shown in Figure.2), if “Global Space” is selected, the position of generated splines object based on the object coordinate system of original object itself (as shown in Figure.3).
Min Distance: defines the minimum distance between the two vertices which can be used to generate a linear spline.
Max Distance: defines the maximum distance between the two vertices which can be used to generate a linear spline.
Visibility: defines the probability of a given generated spline is displayed, the range of probability from 0% to 100%, if property “Visibility” is set to 100, all generated splines can be displayed (that is:probability equals to 100%), and if property “Visibility” is set to 0, all generated splines can not be displayed (that is: probability equals to 0%), we can control the relative scale of displayed splines by adjusting property “Visibility”, so as to achieve a desired display effect.
Seed: property “Seed” used to produce random number, this property controls which spline could be displayed under the condition of given property “Visibility”, when “Visibility” is set to 100, property “Seed” is invalid.
1.3 Propagation: define parameters which related to generate a dynamic splines growth process based on predifined VertexMap.
Enable: if the property “VertexMap_A” is valid, this enable feature can be turned on, so that the propagation effect for vertexmap can be created.
Speed: defines the speed of dynamic propagation process, the default value of Speed is set to 1.1, as the larger the value of property “Speed”, the faster the propagation process.
Factor: it is one new property of NetCreator V1.3, this property can be used to fine-tuning the speed of dynamic propagation process, if the speed of propagation process is fast and too sensitive to property “Speed”, slow down the speed of propagation process is not easy, then the property “Factor” can be used to provide a fine adjust to slow down the speed of propagation process in more easier way (more detailed examples as shown in Figure.23 and 24).
Turbulence: provide a random disturbance of the dynamic propagation process, the disturbance intensity can be controlled by property “Strength” and “Size”.
2. Example of how to use NetCreator
In this part, we will provide three specific examples to illustrate:
1) How to generate a splines object by single object;
2) How to generate a splines object by two objects;
3) How to generate a dynamic growth propagation process with NetCreator;
2.1 Generate a splines object by original single object (with “Self connection” Mode)
In this section, let’s generate a splines object with “Self connection” Mode.
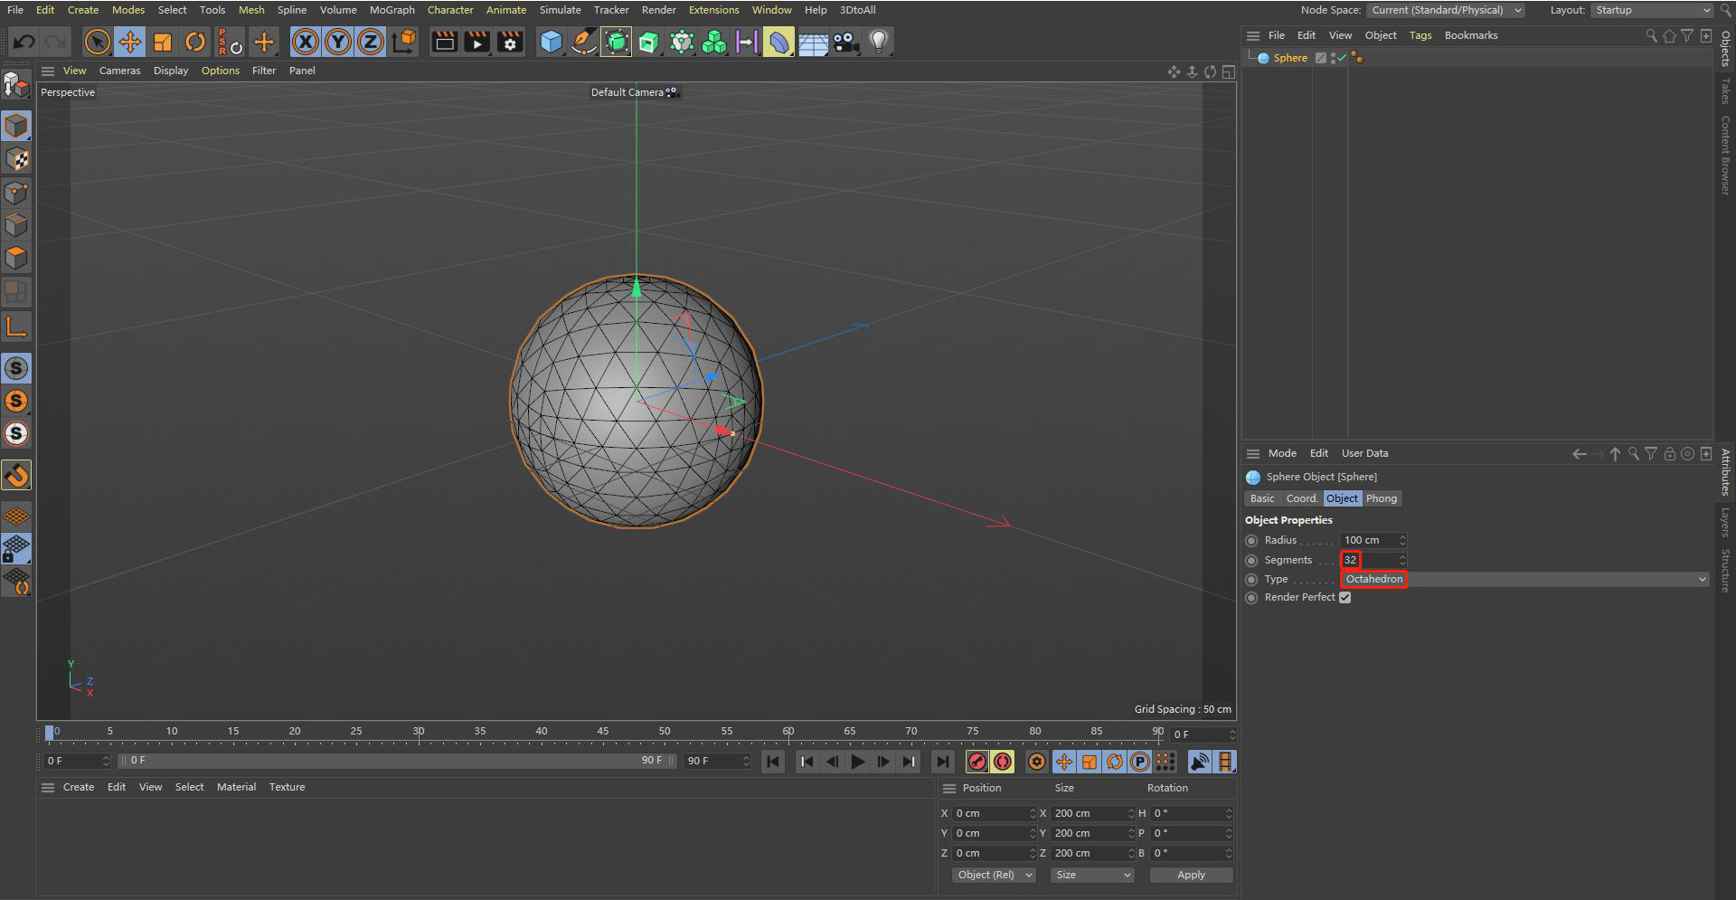
Step 1: Create a parametric object “sphere”, the “Segments” value of object “sphere” is set to “32” and select the property “Type” to “Octahedron” which can provide more uniform vertex distribution effect.
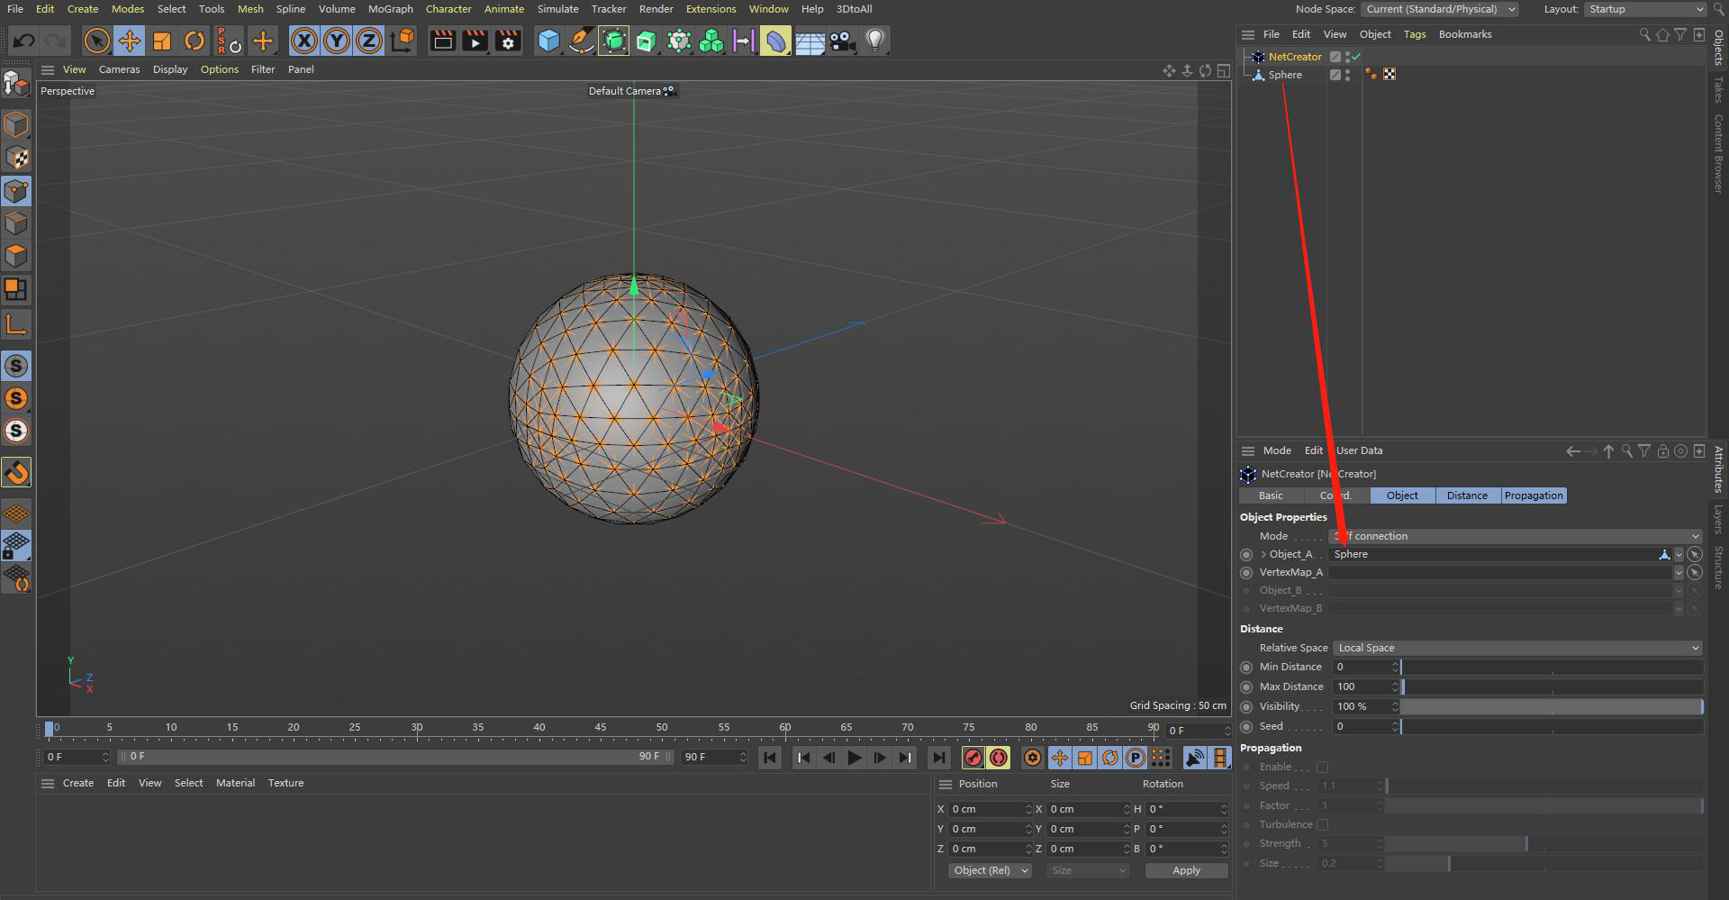
Step 2: converts the parametric object “Sphere” into a polygonal object (Shortcut C), and create NetCreator plugin from the “Extensions” menu of C4D, then drag the polygonal sphere object to NetCreator’s attribute “Object_A”.
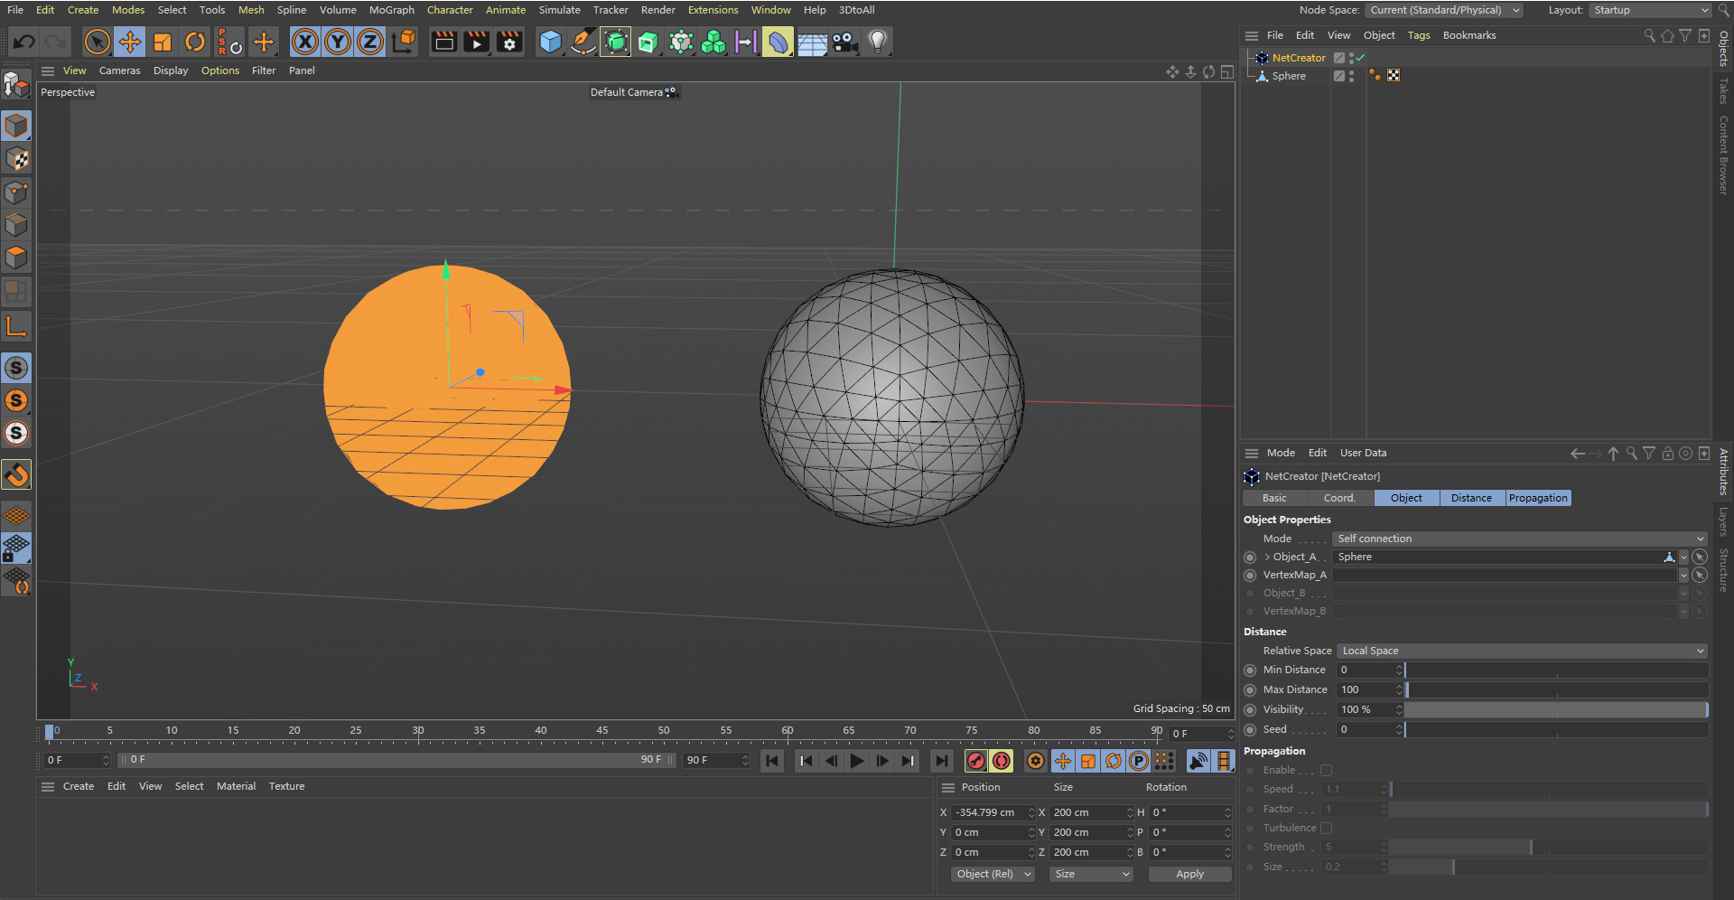
Step 3: in order to avoid overlapping of two objects, let’s move the original object “Sphere” from the origin point of world coordinate to another position what we wanted (as shown in figure.6). It is can be seen that the surface of the generated sphere is make up of lots of splines.
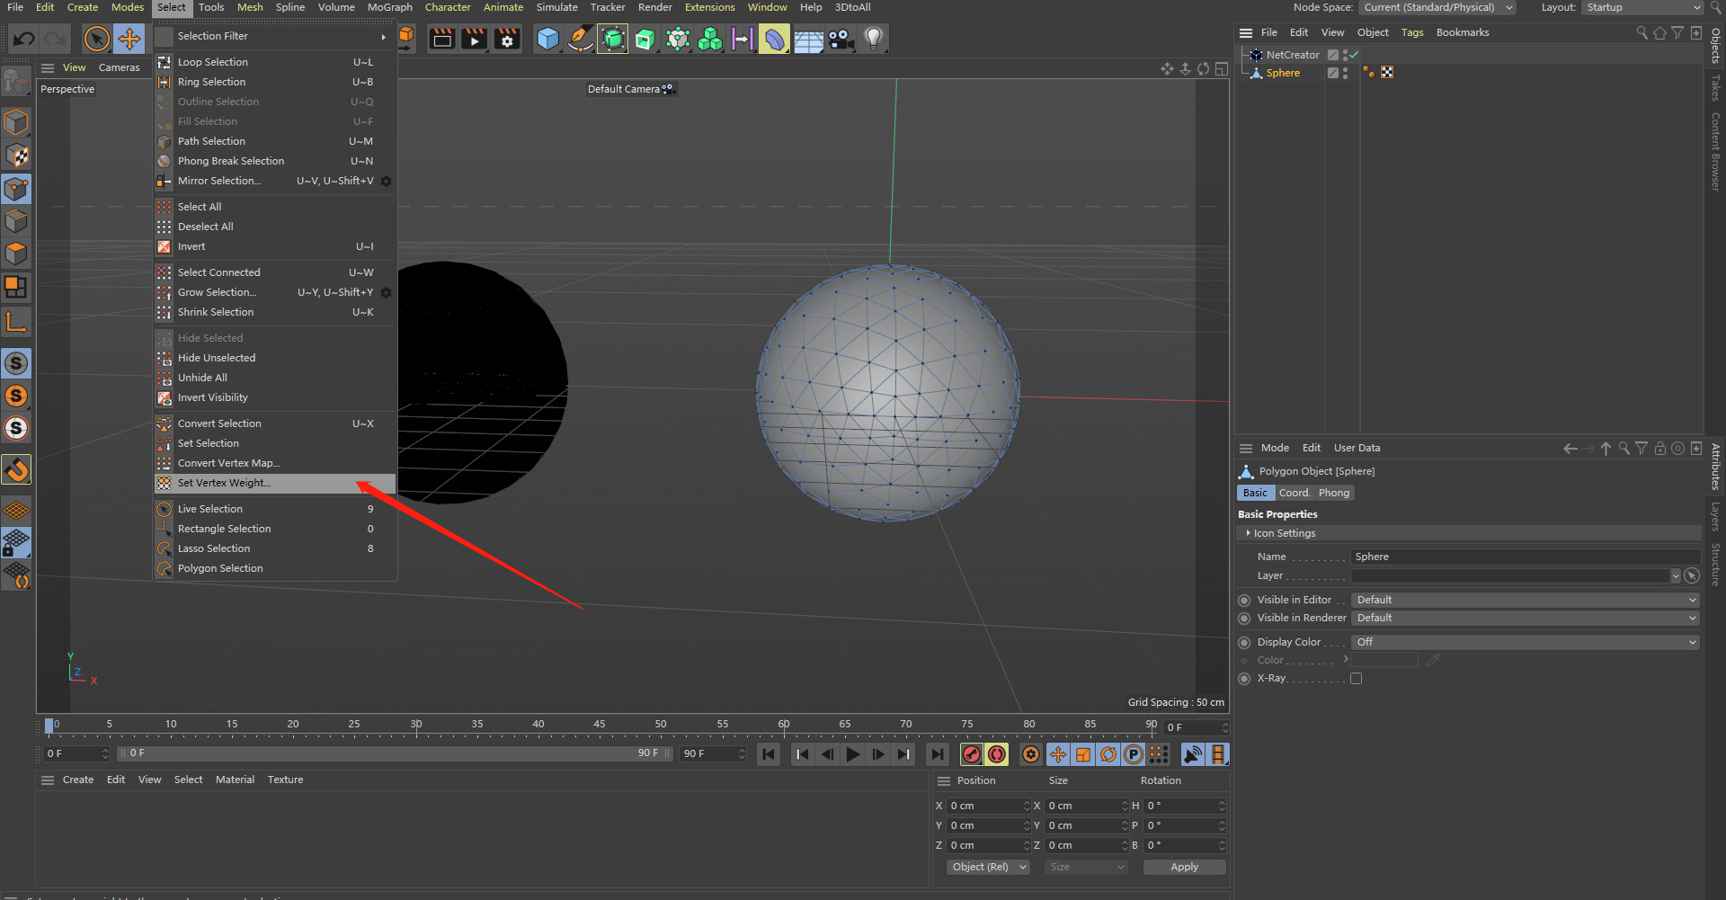
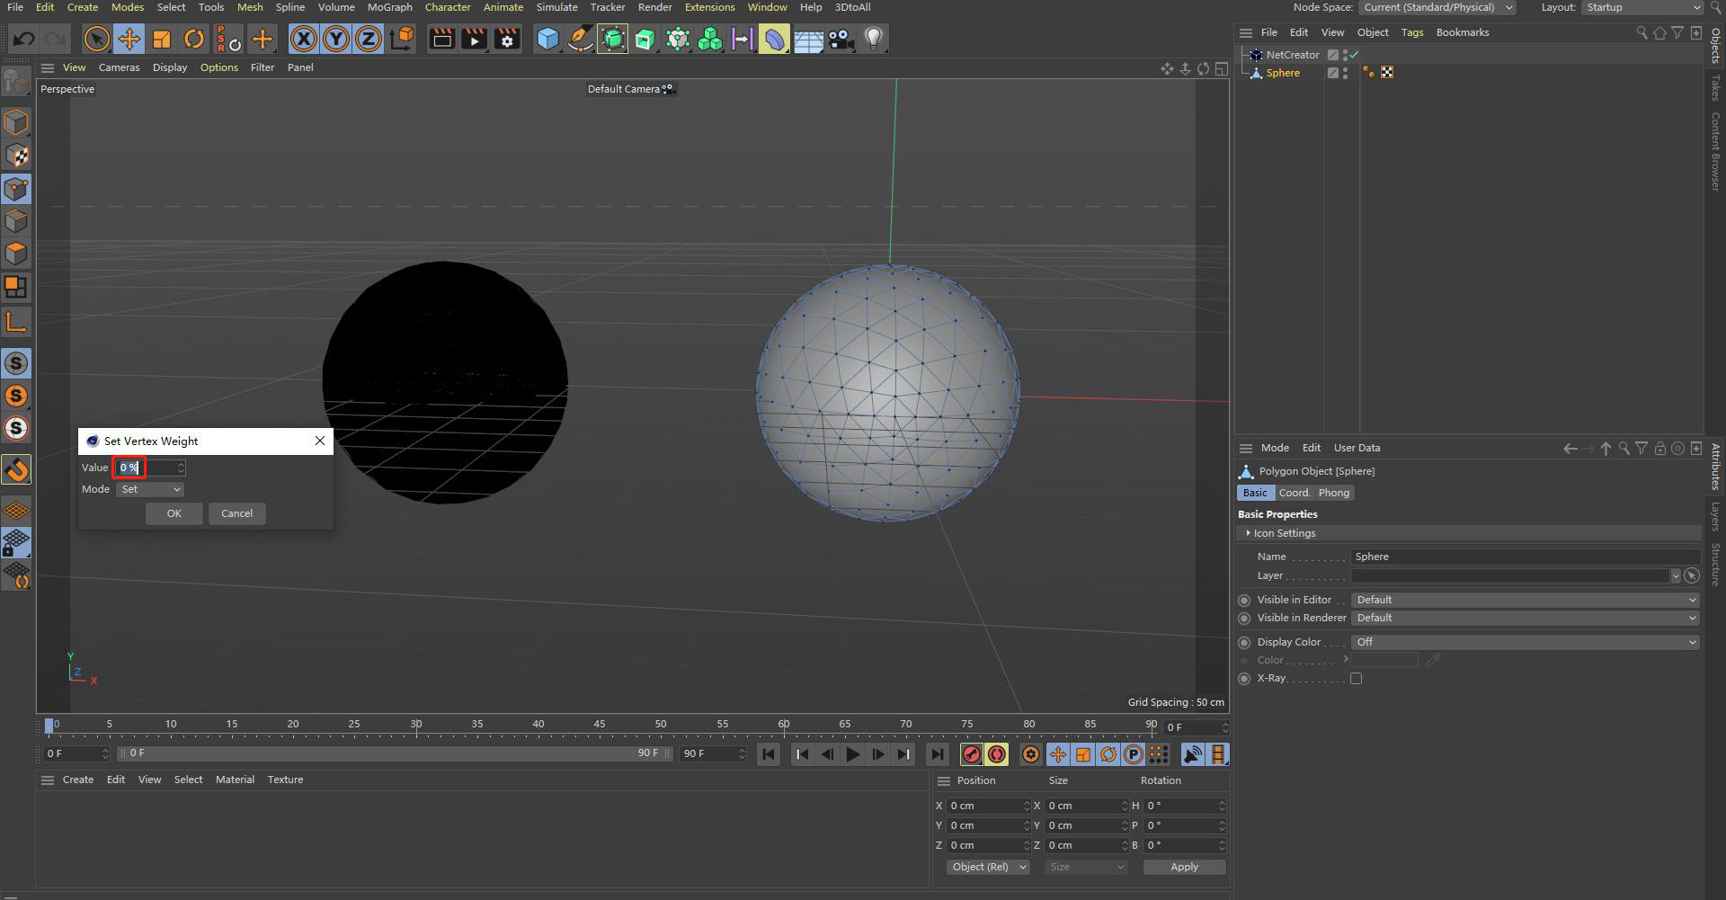
Step 4: active the sphere by click the polygonal sphere icon at Object Manager Windows, then let’s generate a VertexMap from C4D menu “select”->”Set Vertex Weight”, in the popup menu of ”Set Vertex Weight”, let’s set the value to 0%, this means that the weight of all vertices of polygonal sphere are zero, because all vertices weights are zero, the color of original sphere will be shown in red color.
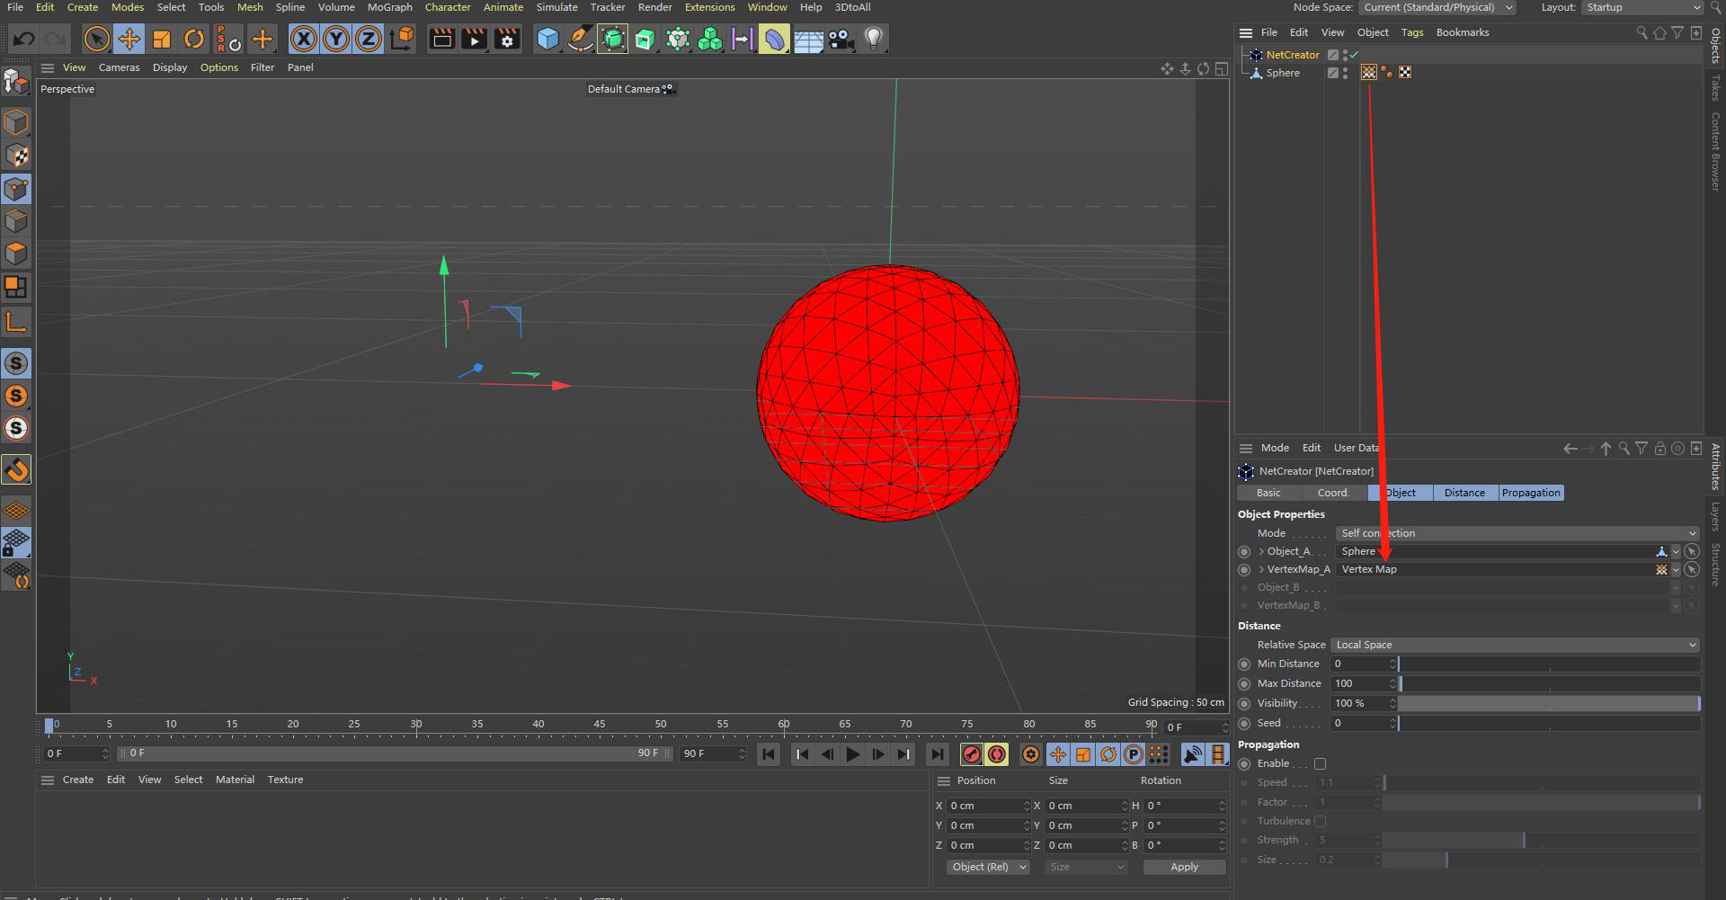
Step 5: drag the “Vertex Map Tag” icon in Object Manager into the attribute “VertexMap_A” of NetCreator plugin, after doing this, the splines sphere object disappeared Immediately, it is because all vertices weights are set to 0 (weight < 0.5), so that all vertices can not be used to generate splines.
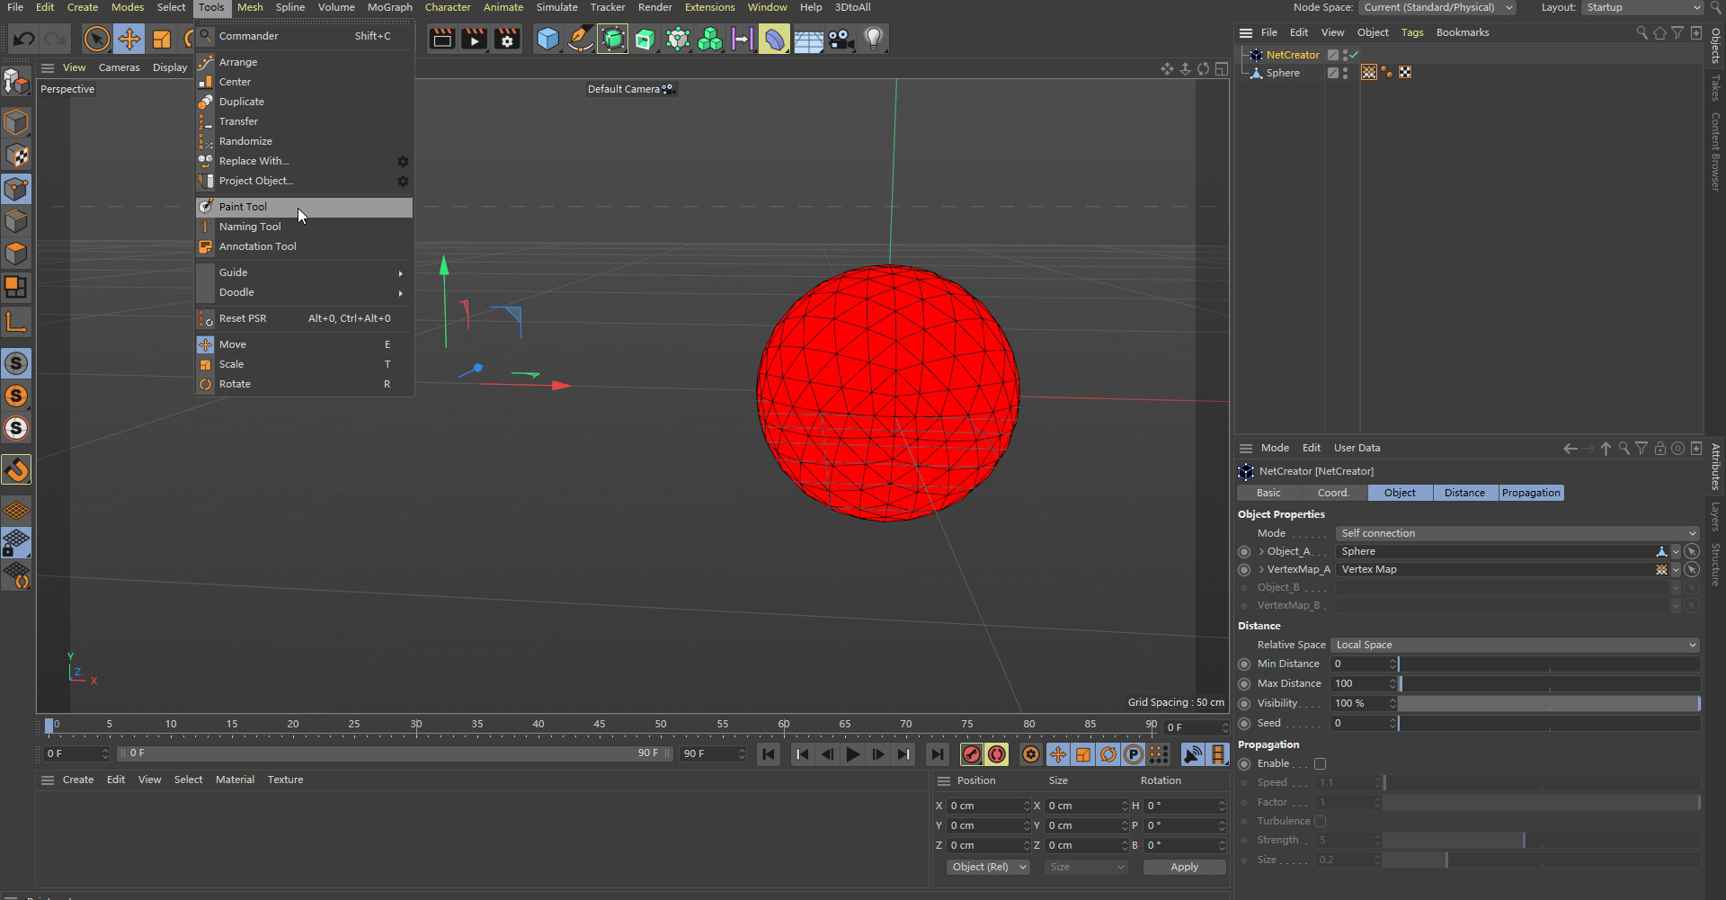
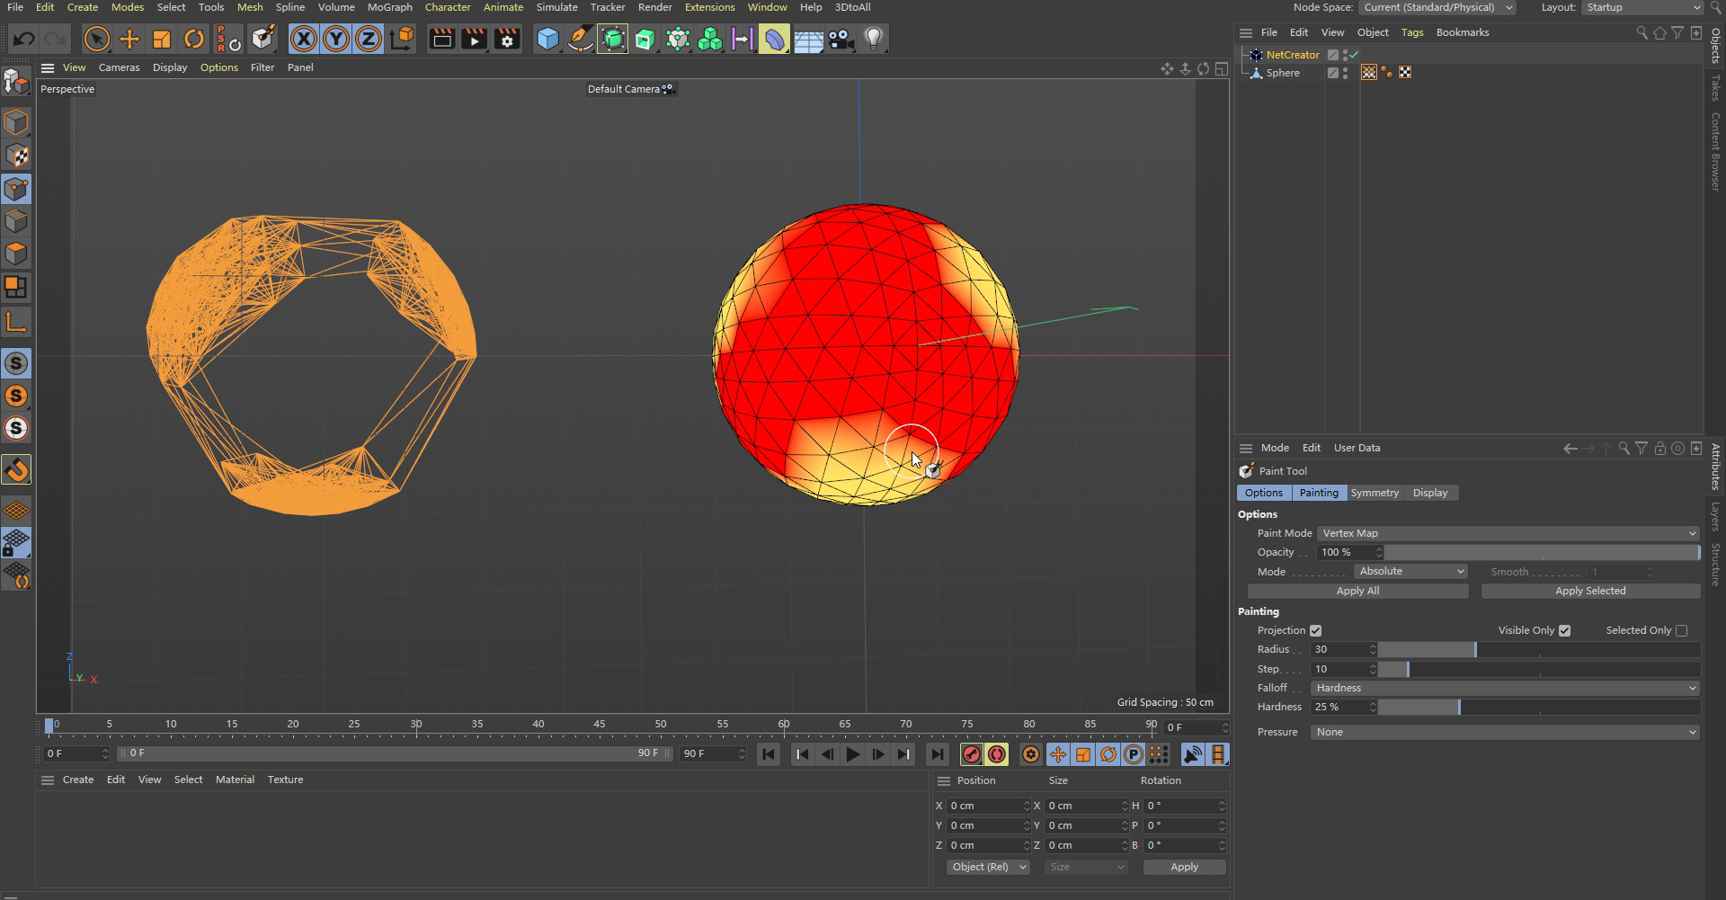
Step 6: click the NetCreator plugin icon in Object Manager, then open paint tool from C4D menu “Tools”->”Paint Tool”, we can draw a weight map manually by using paint tool, at the same time of drawing weight map, we can see the generated splines object synchronous change at the same time, so we can generate some kinds of splines object what we want by control and drawing the weight map (also known as VertexMap).
In this example, finally we generate a splines sphere object with hollowing effect by NetCreator.
2.2 Generate a splines object by original two objects (with “A-B connection” Mode)
NetCreator can also generate a splines object by two objects, next we will show how to use “A-B connection” Mode to generate a skeleton object of letter “A”.

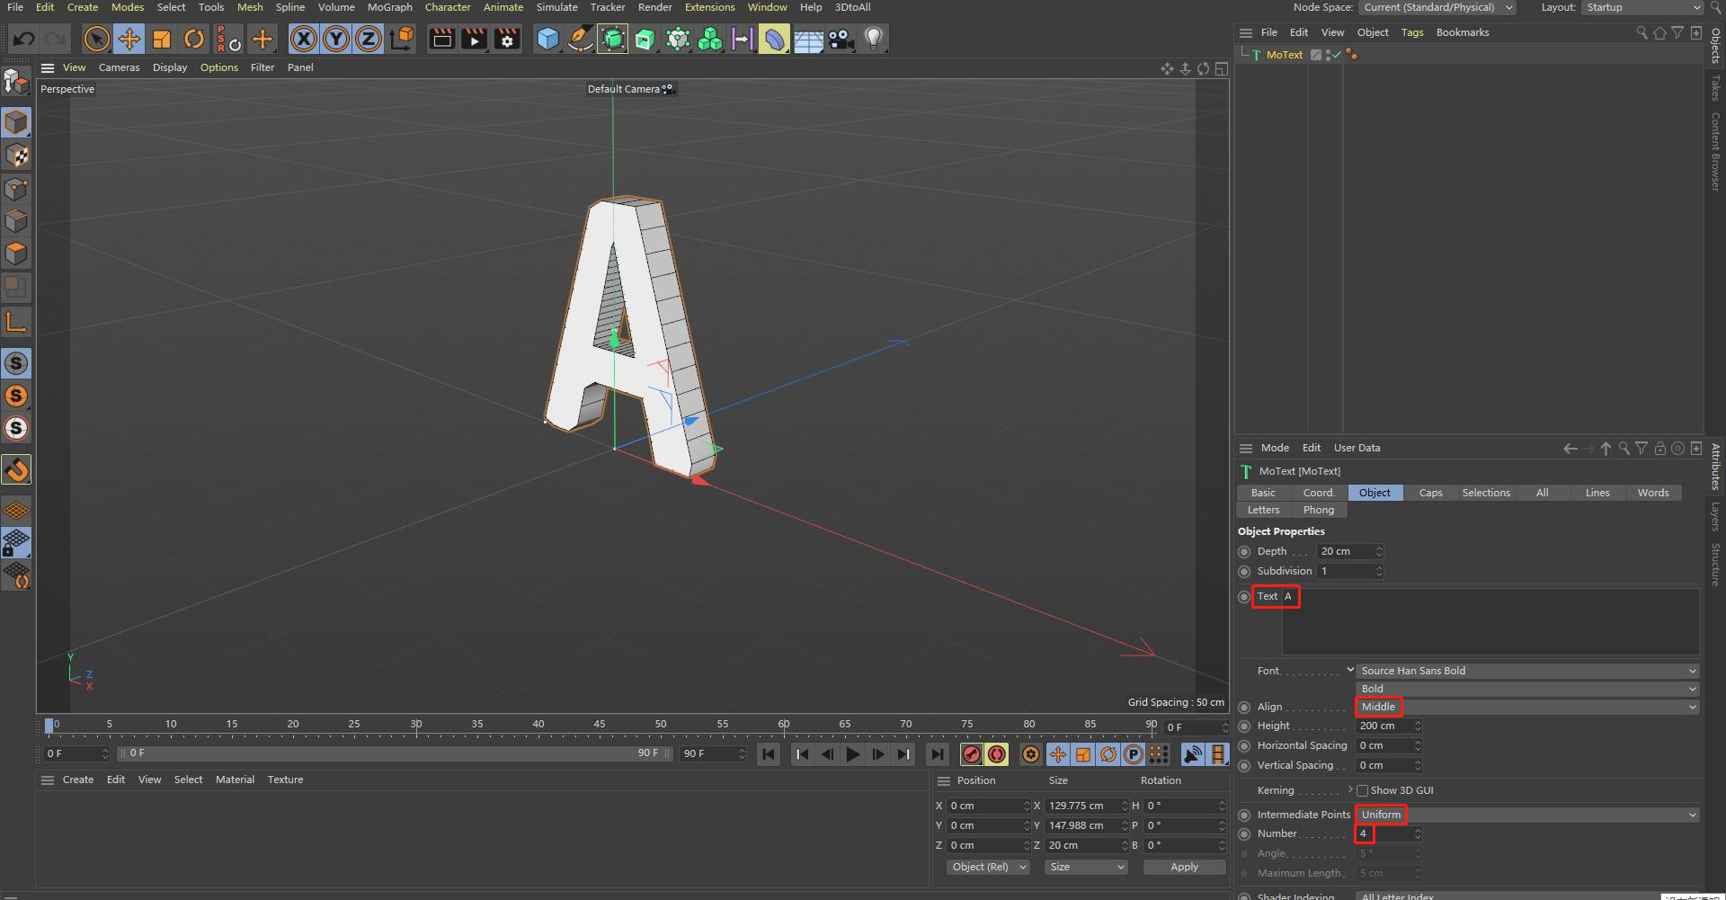
Step 1: let’s create a letter “A” object by click “Cloner”->“MoText” in Command Groups palette, write “A” in Text property of MoText, and set property “Align” to “middle”, property “intermediate Points” to “Uniform”, set the property “Number” to “4”.
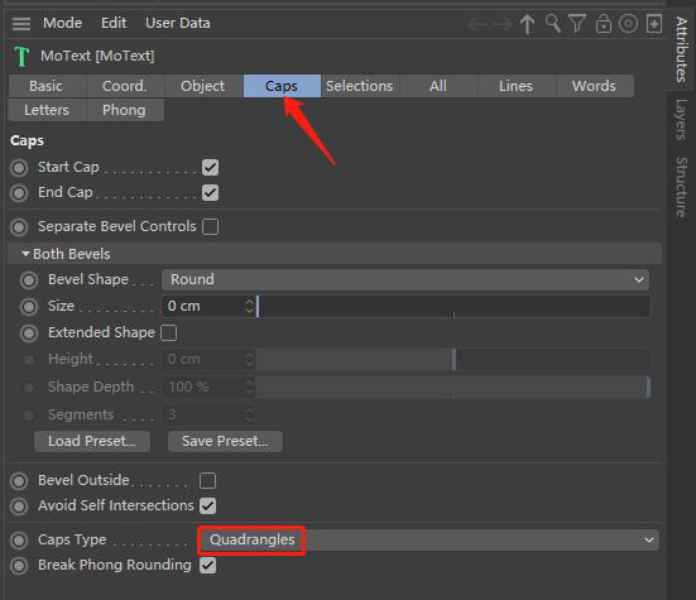
Then click “Caps panel” of MoText and set the property “Caps Type” to “Quadrangles”. These settings will make the letter “A” object consist with quadrangle polygons at nearly same size.
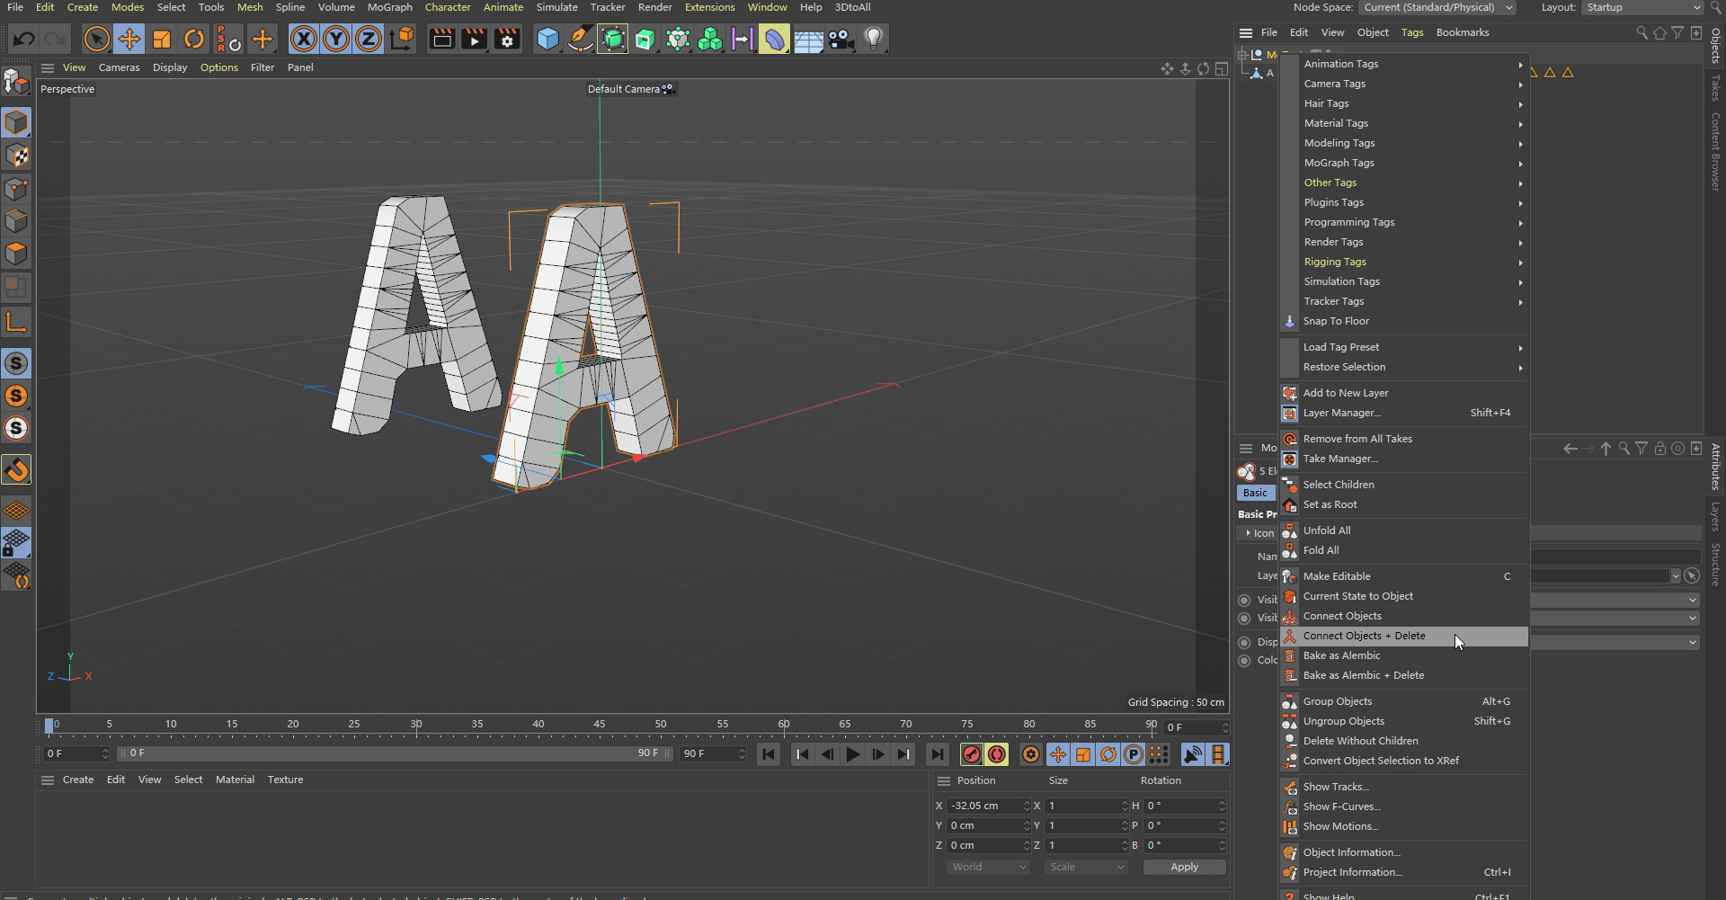
Step 2: duplicate a letter “A” icon in Object Manager by “CTROL” + drag the icon, and convert these two letter “A” objects into polygonal objects, because of the generated object contains multiple sub objects, so let’s click one of the letter “A” object icon by using middle mouse button, after that, all sub objects will be selected.
Next, right click the letter “A” object icon in Object Manager and select “Connect Objects + Delete”, then we will obtain two polygonal objects of letter “A”.
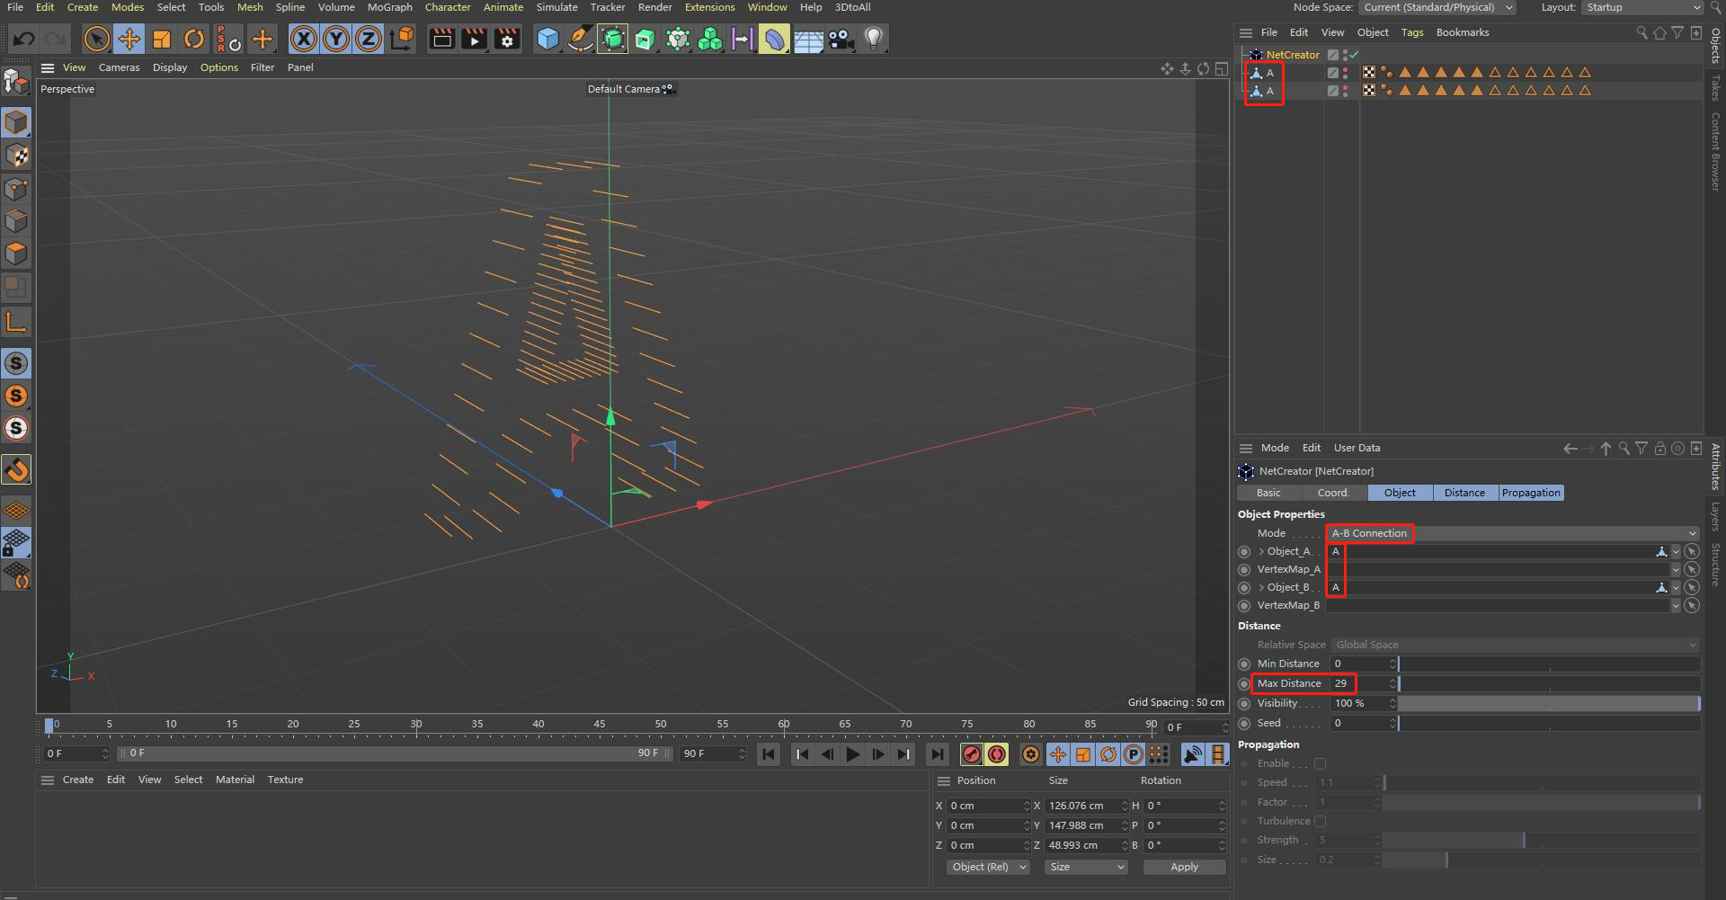
Step 3: create NetCreator plugin from “Extensions” menu, set the property “Mode” to “A-B connection”, and drag the two polygonal objects icon of letter “A” from Object Manager into property “Object_A” and “Object_B” of NetCreator plugin respectively. Carefully adjust the property “Max Distance” to a suitable value, finally, we will generate a skeleton object of letter “A” as shown in figure.16.
2.3 Generate dynamic growth propagation process
Step 1: As we’ve explained in example2.1,firstly let’s create a parametric object “Sphere”, set the “Segments” value to “32” and select the property “Type” to “Octahedron”. Next generate a VertexMap by click C4D menu “select”->”Set Vertex Weight”, in the popup menu of ”Set Vertex Weight”, we set the value to 0%.
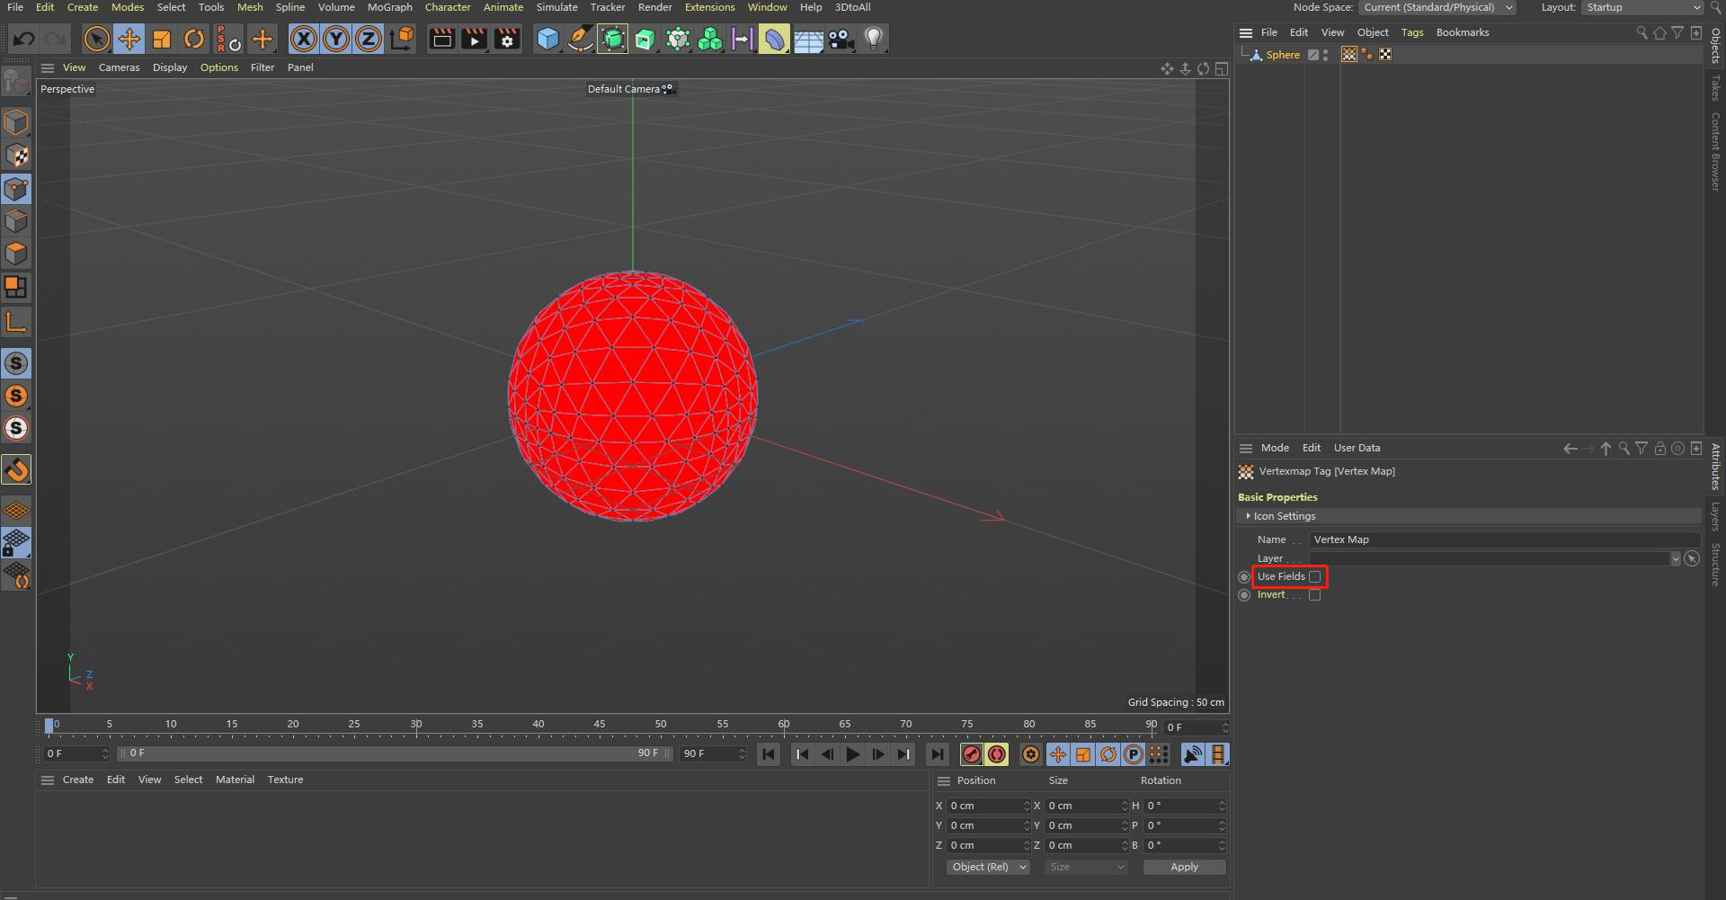
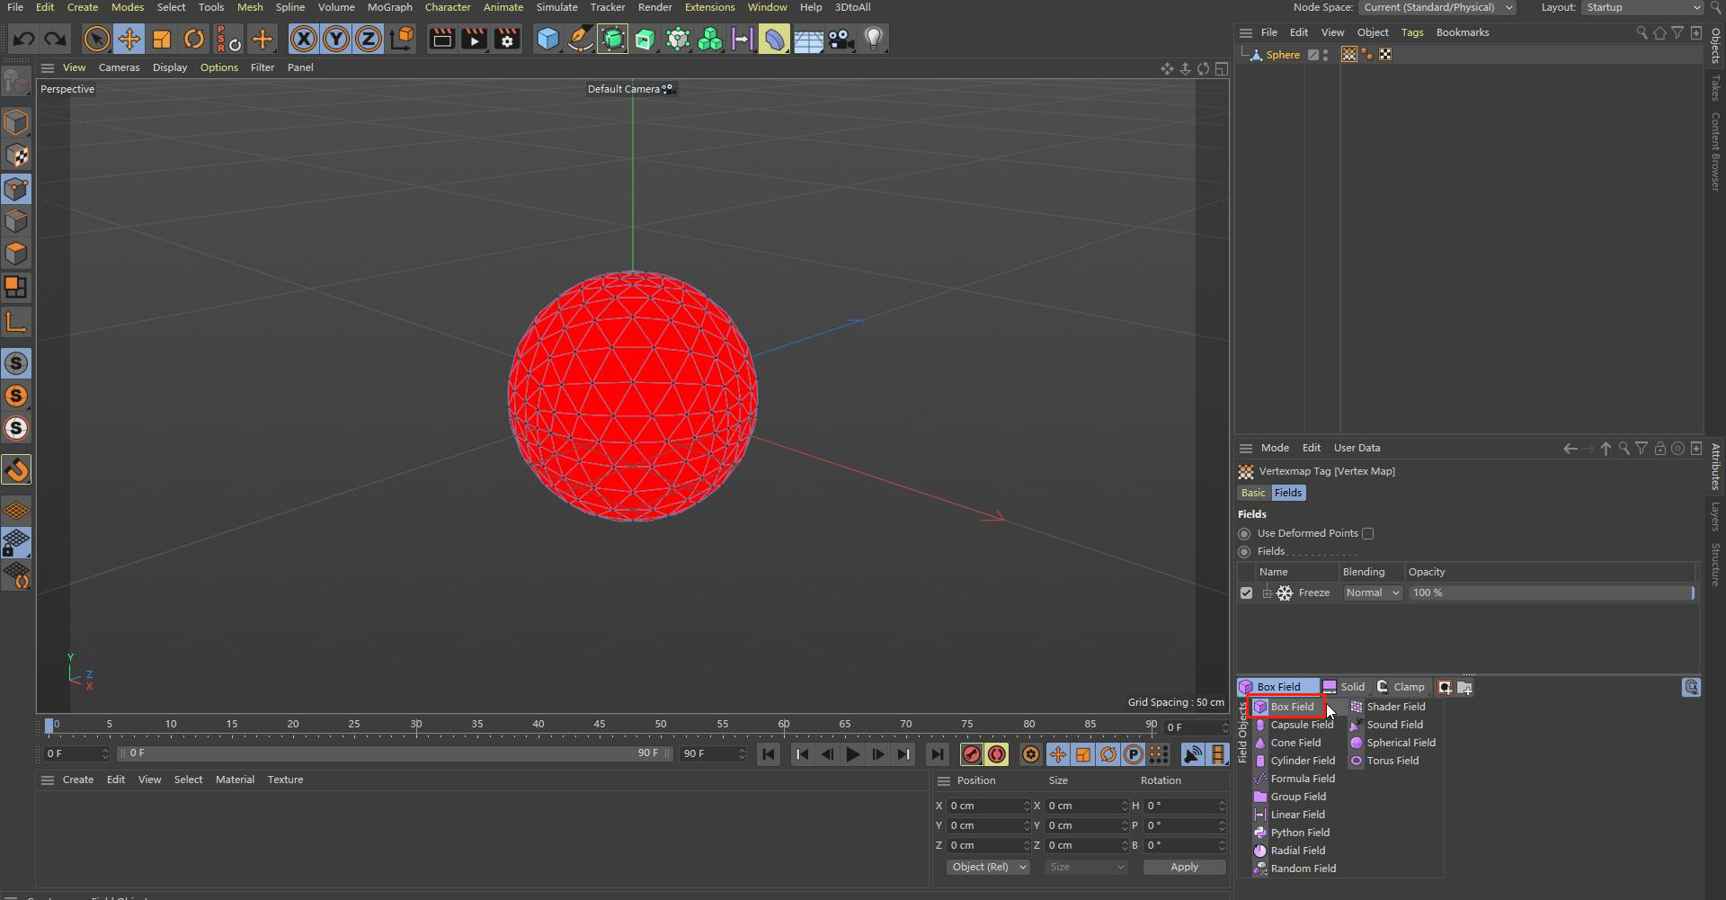
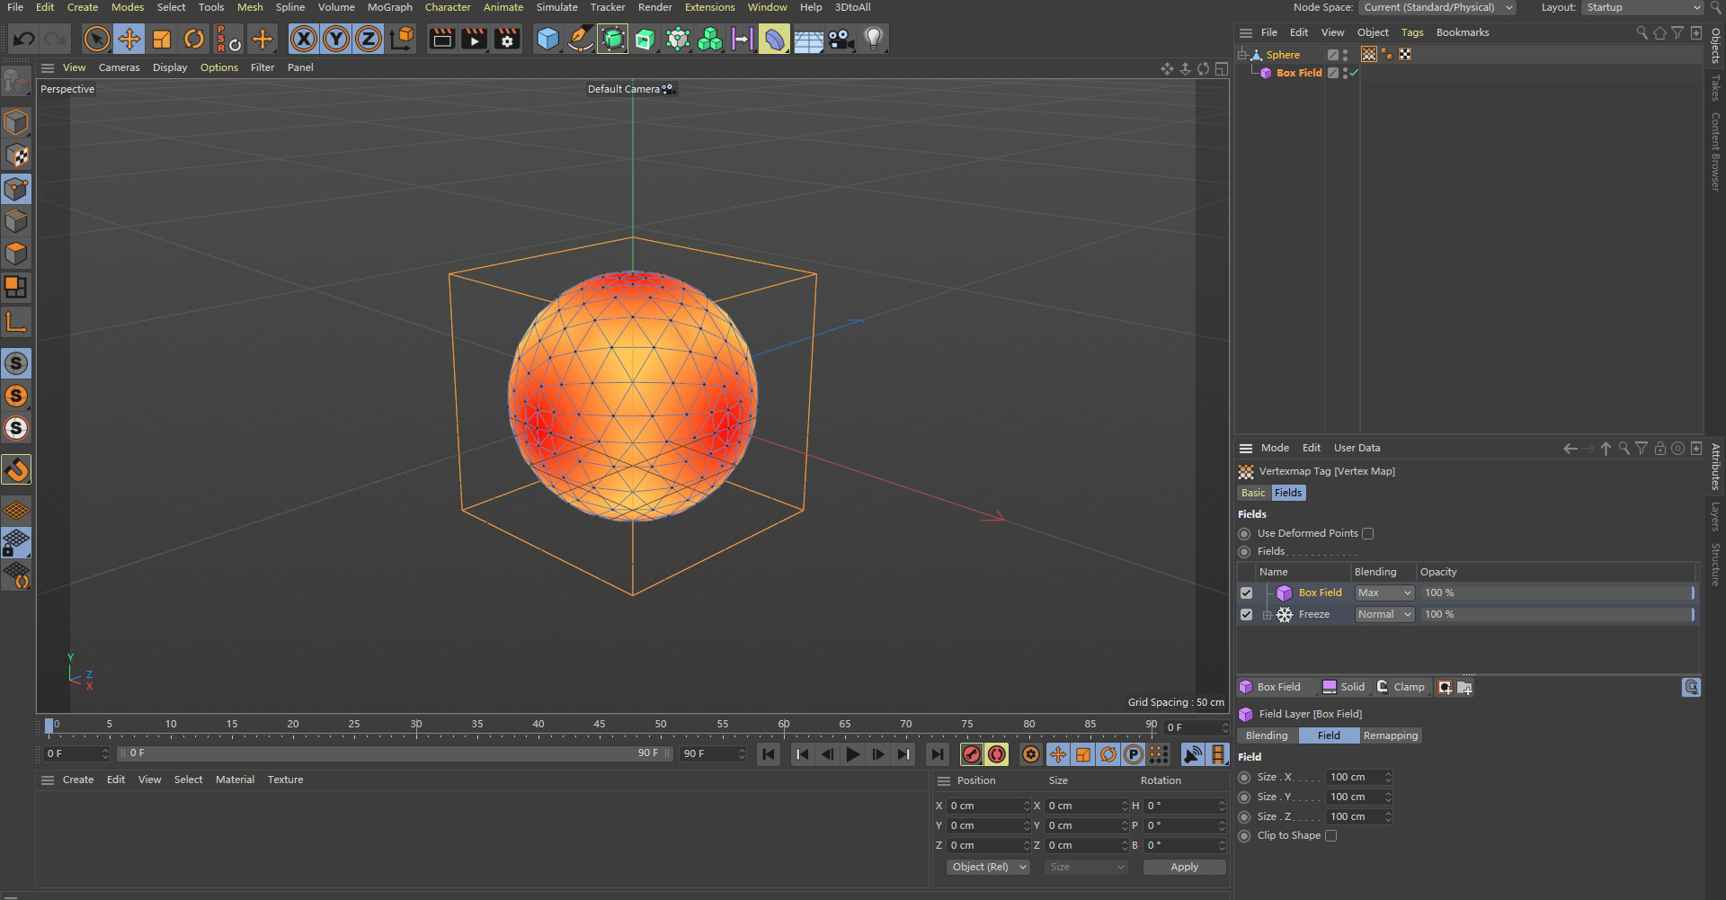
Step 2: Unlike drawing VertexMap manually in example2.1, this time we will enable the property “Use Fields” of “Vertexmap Tag”, and select “Box Field” in Field panel, then an VertexMap has been created automatically (as shown in Fiture.19).
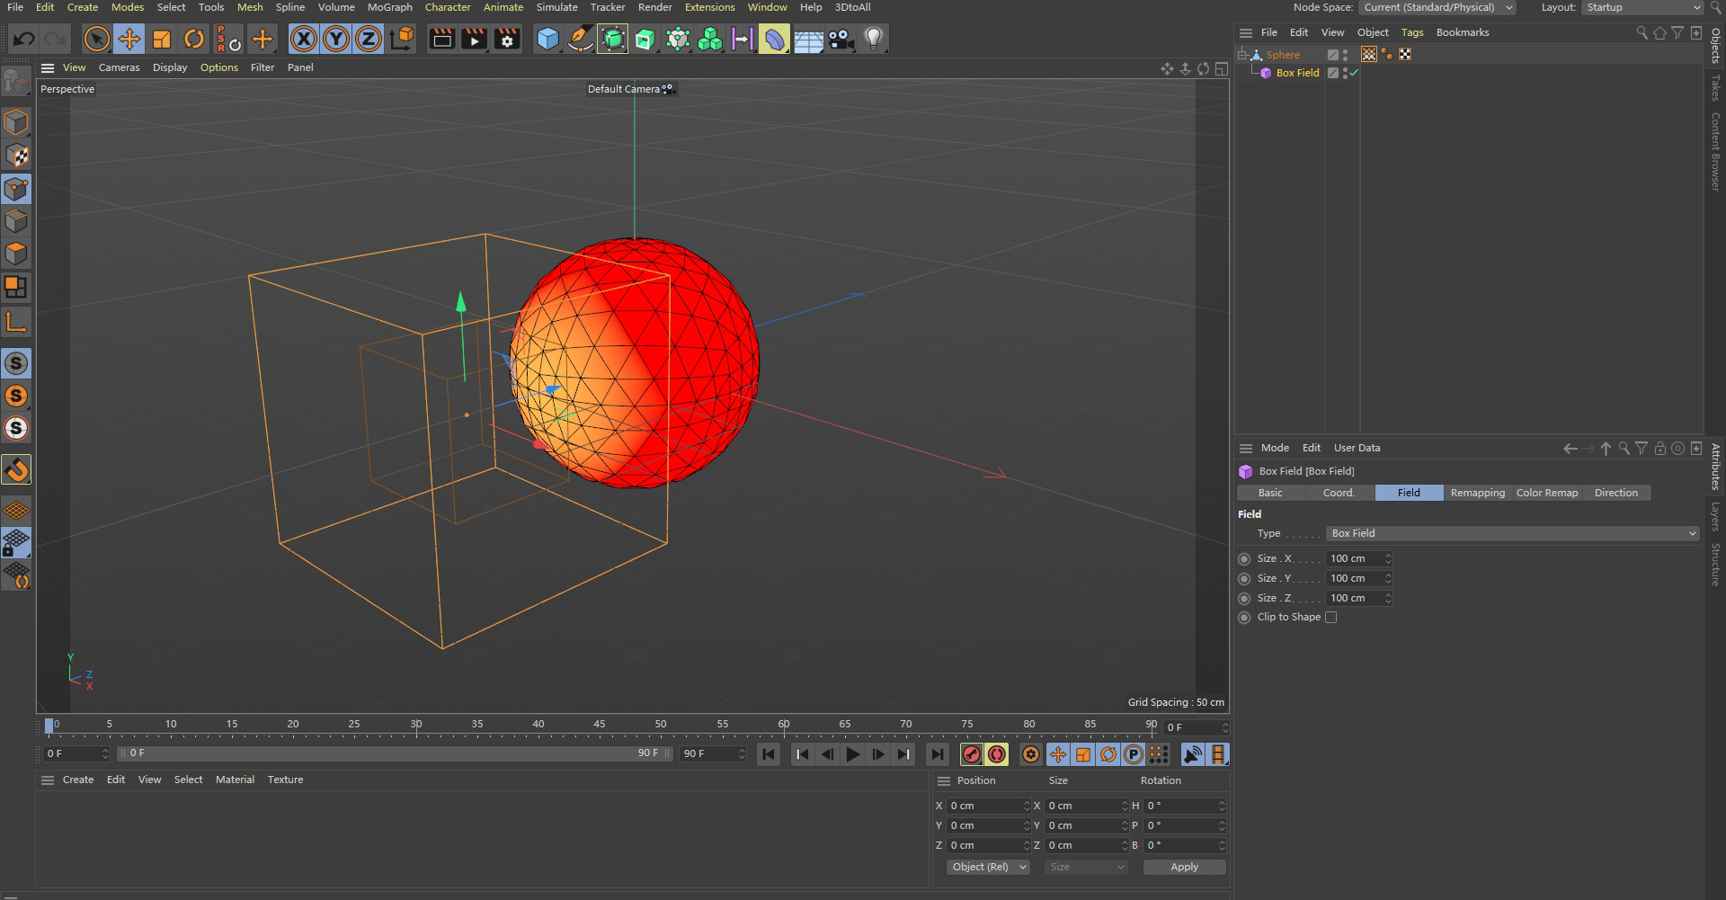
Step 3: By drag the “Box Field” in 3D View Windows, we can decide the position of the “Box Field”, and obtain a vertices weight map as what we wanted.
As we can see, the red color in vertex weight map represents the weight is 0, and yellow color in vertex weight map represents the weight is 1, the transition color between red and yellow represents the weight between 0 and 1.
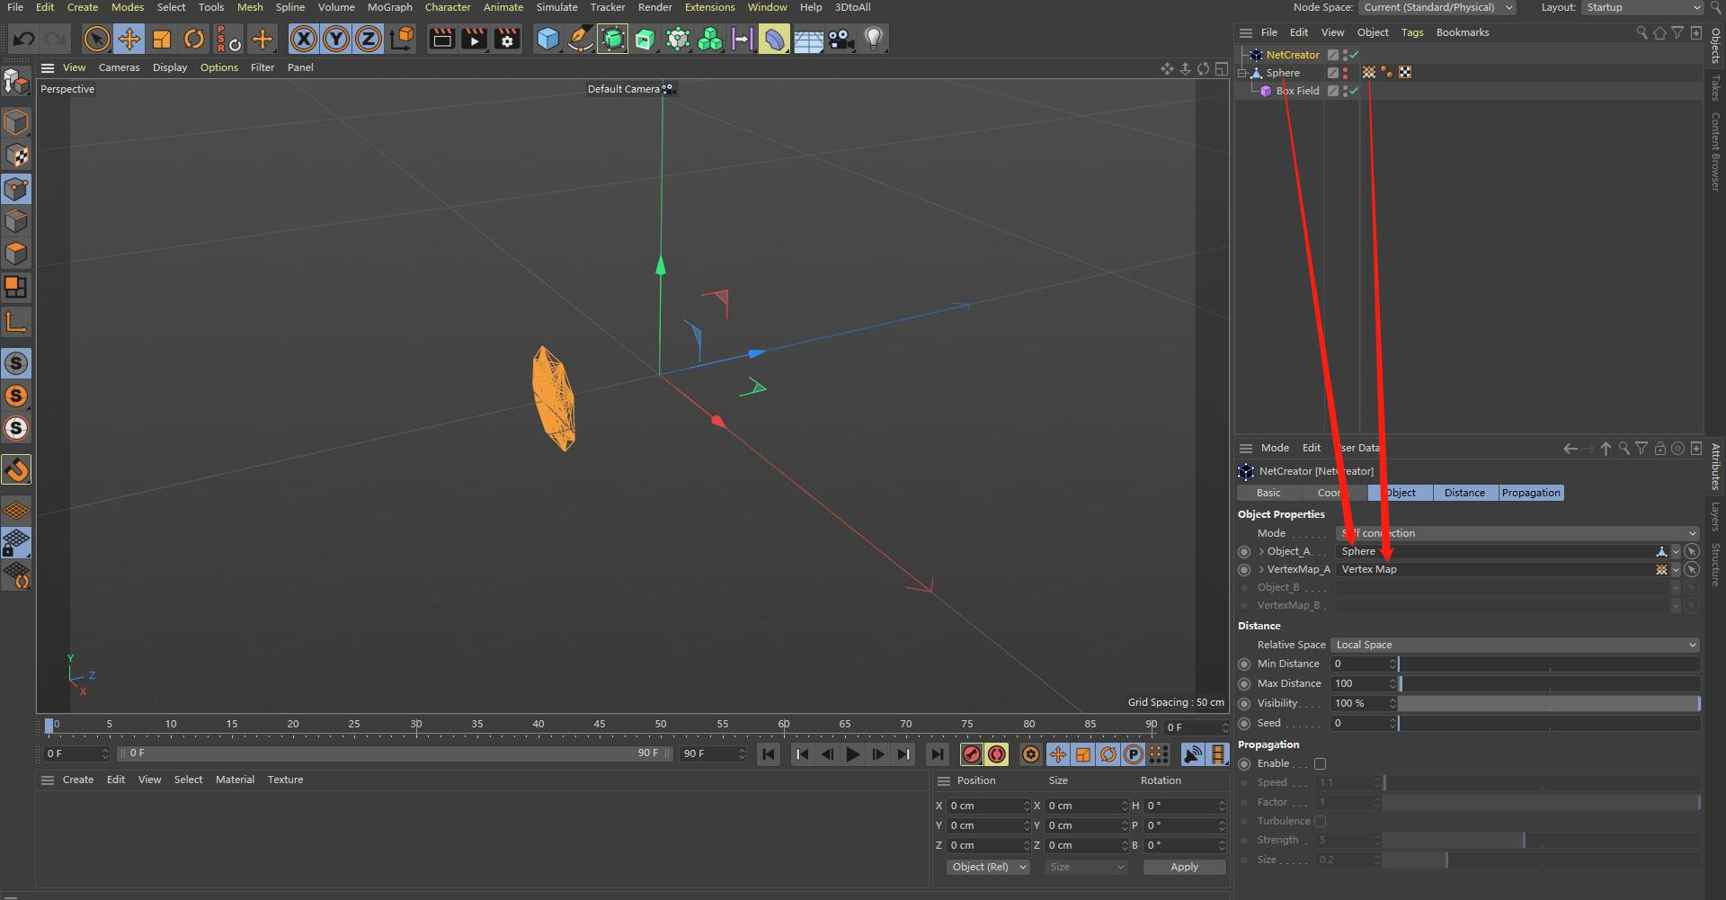
Step 4: if we are satisfied with the VertexMap that have been created just now, let’s create a NetCreator plugin from “Extensions” menu, make sure the property “Mode” is “Self connection” (it is important that dynamic growth process only be available under “Self connection” Mode).
Next, let us drag sphere object icon in Object Manager into property “Object_A” of NetCreator, as well as drag the “Vertex Map Tag” of sphere object into property “VertexMap_A”.
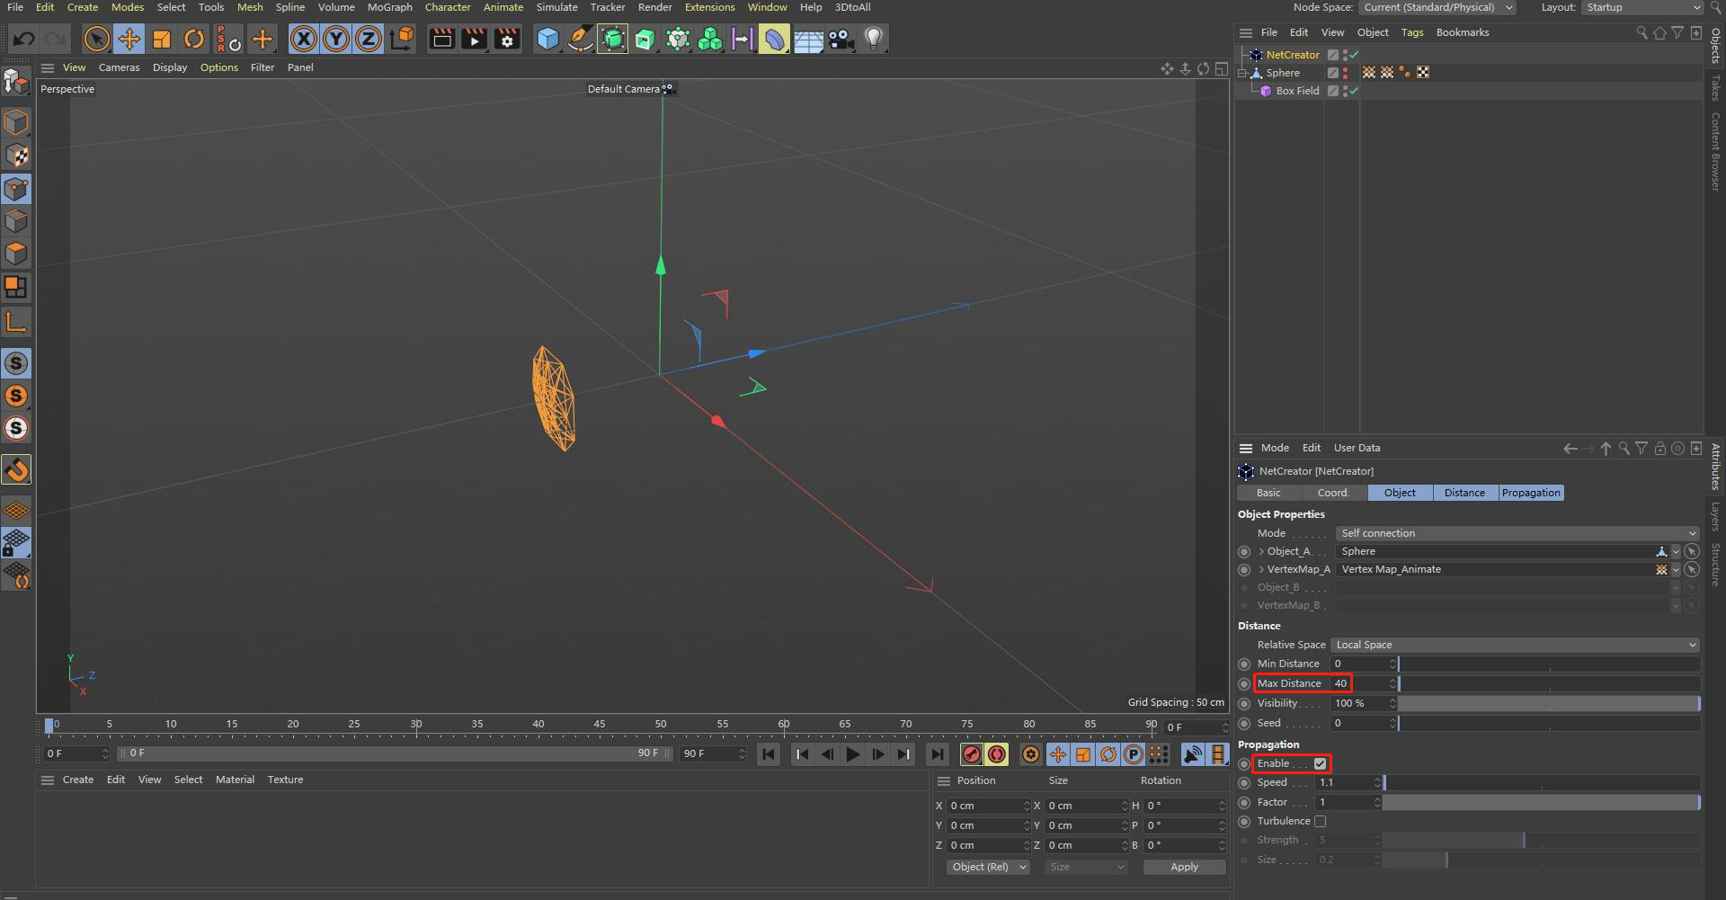
Then set property “Max Distance” to “40”, and enable the “Propagation” property.
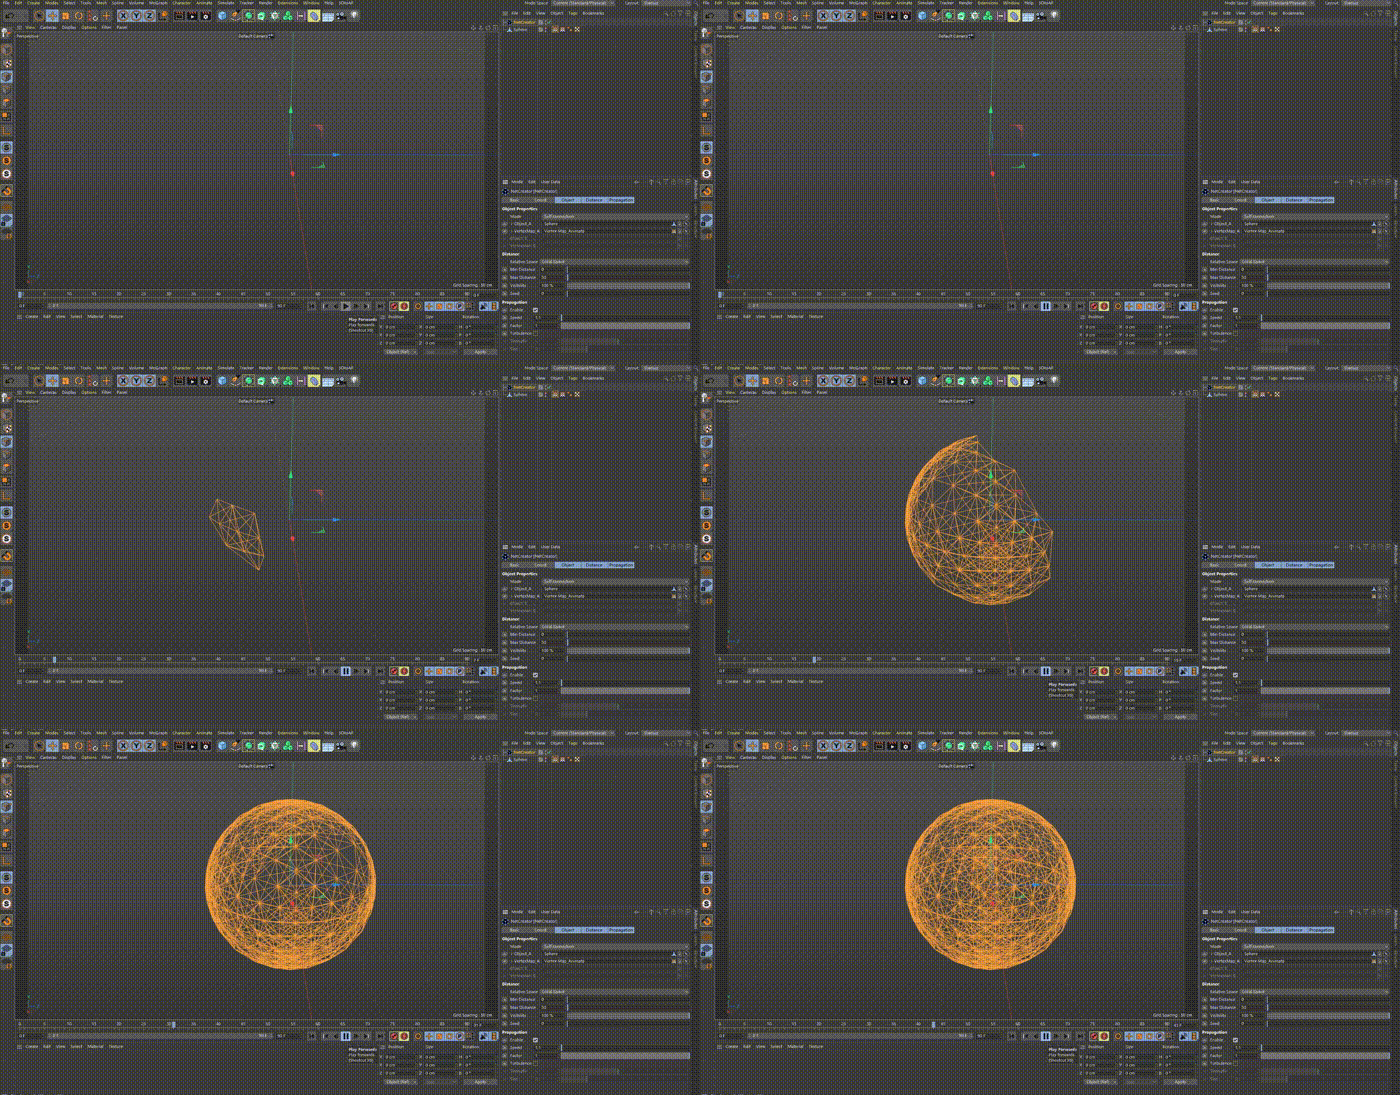
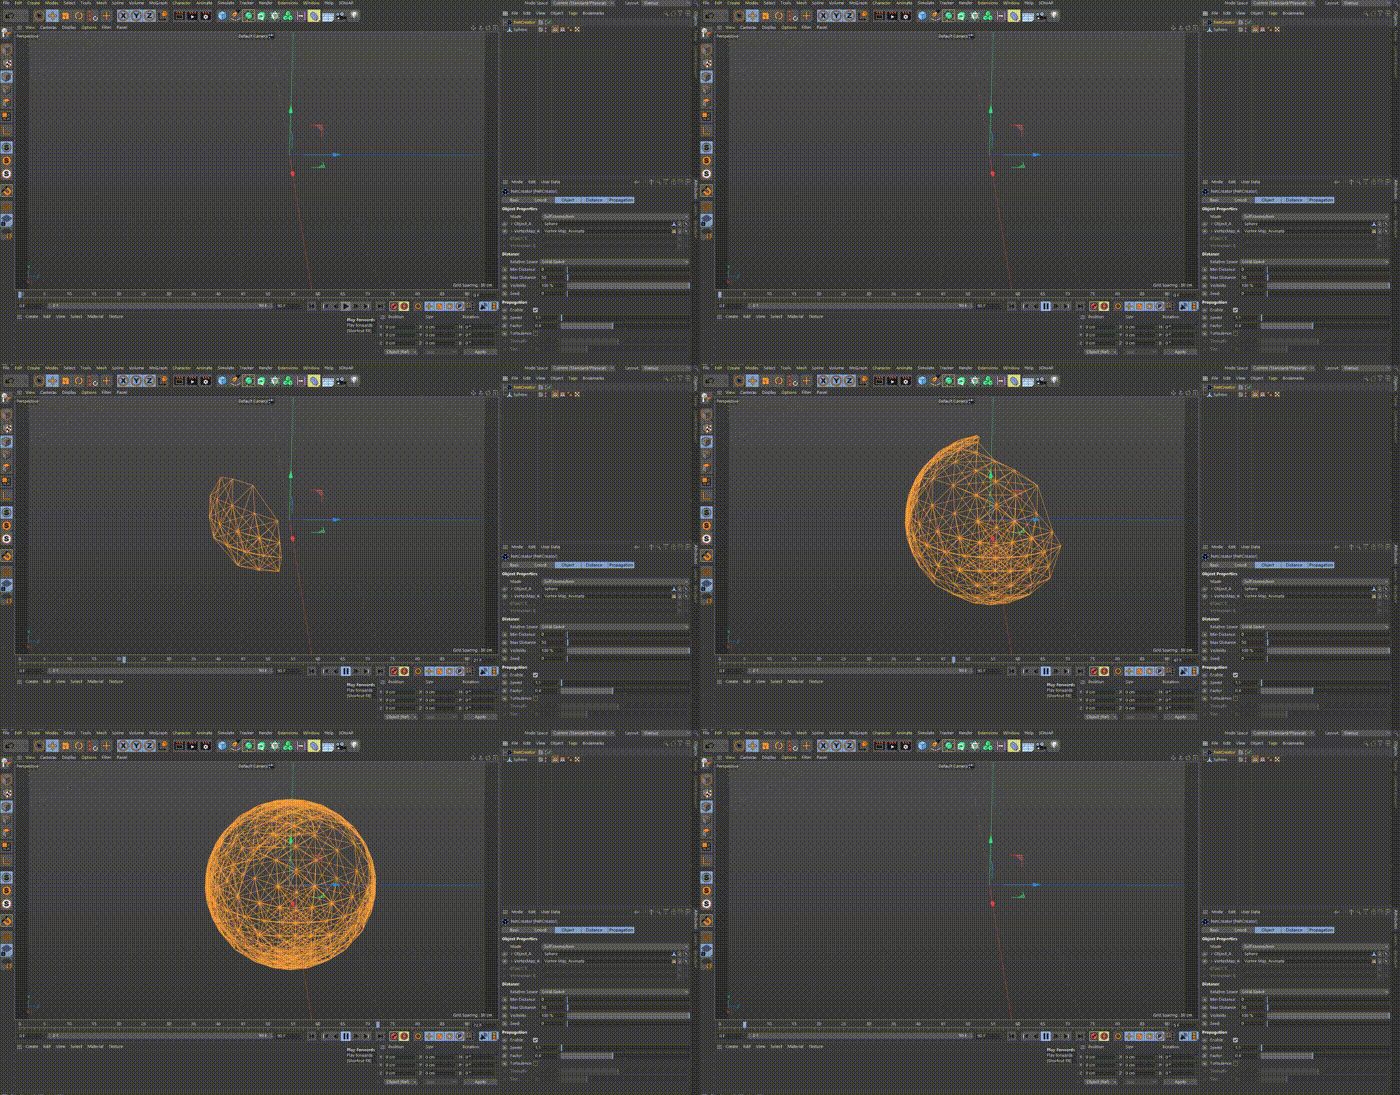
Step 5: after above operation, we can click “Play Forwards” button in Animation Toolbar of Cinema 4D, then we can see the dynamic splines growth propagation process as shown in figure.23 and figure.24.
If the speed of dynamic growth process is too fast, we hope to slow down the speed, there are two methods: adjust the property “Speed”, or adjust the property “Factor” to control the growth speed, firstly we shoule try to adjust property “Speed”, if it is difficult to adjust, we can try to adjust the property “Factor” for a fine tune propagation speed. From figure.23 and figure.24, we can see that the propagation speed can be significantly reduced by adjusting property “Factor”.
can’t download,would you please help me, thanks a lot!
Hi, Ruo:
I have sent the NetCreator v1.3 plugin to your email, please enjoy it.
Hi
Can the plugin work with C4D r17?
Thanks
Sorry, I’m not sure if this plugin can be used for C4D R17, but according to user feedback, this plugin can be used for C4D R19, R21, R23 and some other versions. Could you please test if this plugin can be used for C4D R17 and let me know the results?, If necessary, I will try updating the version. Thank you!
Well, Netcreator 1.3 does work with C4D r17, there seems to be a limit on the polygon count, it doesn’t want to work with anything more complex than a sphere. It is a cool program, thanks!
BG
Hi,BG:
Thanks a lot for your kindly feedback!, I will arrange time to test and fix this issue. Due to the recent high work pressure, I will find time to fix this problem as soon as possible!. If you encounter any problems, please feel free to contact me at any time, you are wellcome!